[Note: This month, we have several STAMPlorations girls guest designing and joining the regular Spotlight Project girls and sharing more awesome step-by-step projects that feature our 5x7 stamp club sets. We hope you get even more inspired!]

Hello and Welcome! Ina here from Little Bits of Craft. Today I am back focusing again on the beautiful Boxed Blooms and Bold Sentiments stamp set.
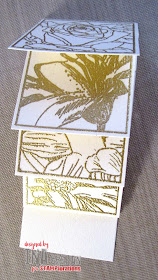
I had been procrastinating over how I would showcase this set and funny that it came to me as I lay in bed thinking about it. I wanted to try something I had never done before and the Waterfall Card came to mind. I needed some guidance on measurements and I found this fabulous tutorial to help me. I have added my own twist here making sure that the measurements matched the framed blooms and our Australian size base. PS: I did do a dummy run to make sure things were A OK! Here is the result - completed.
and how it all began WARNING! Lots of photos to come.
I didn't want to colour them this time and I was undecided as to what to use on the blooms so tried 3 different embossing powders finally settling for Stamp It Gold on a slightly gold metallic paper. I also found some really thick gorgeous deep gold card stock which helped make up my mind to go for gold.
I then cut them out leaving a small edge as I didn't want to add a paper backing in case it made them too hard to flip.
I rummaged through my drawers and found a light weight gold metallic paper and decided to add a touch of elegance for the bloom background. I got out my Flourishes Stencil and heat embossed it with clear embossing powder. I was a little scared to add too much colour as I didn't want to take away from the gold blooms so went clear.
Here's a close up.
I taped this to my gold card base then went on to add my waterfall. After cutting my card stock to size I then scored at intervals as you see below.
...and attaching each framed blossom taping the top part only.
I added a sentiment to the inside from the Fluttery stamp set and a flower from Floral Bliss.
Next was to add a small strip to my stenciled back to hold the waterfall in place and punch a half circle to pull down the blossoms. I went with the strong red tape to make sure it stayed put.
The back part of the bottom blossom is taped to hold in place also. After that was done I needed to add something either side and came up with my Clustered Hearts Die. At first I had cut them in the pale gold. After being painstakingly careful to keep them all together I decide to take them out and cut another with the darker gold - doesn't it make a difference!
The few waterfall videos's I have watched have used ribbon as a pull down but I decided to add another of those gold hearts - all there is that half circle at the back to help. The one heart looked bare lonely when I pulled the blossoms down so added 2 more to finish it off.
And there is my finished Spotlight.
The products I used are:
I hope you enjoyed reading how I created my first waterfall card. It was easier than I thought. Give it a go and create something a little different.
AND you know there is a 20% discount that applies to all normal priced and discounted stamps stencils and dies. Just use my code STAMPGIRLINA and you are good to go!


Absolutely stunning creation. So classy in the gold and white. Loved how you tried this waterfall card for the first time and what an amazing result x
ReplyDeleteLove the gold and white theme - super card too!
ReplyDeletelove the idea of the waterfall....great card
ReplyDeleteBrilliant - and I am so glad you shared this as I had forgotten about waterfall cards - used to make them frequently. This is beautiful in white and gold - the little hearts are so pretty!
ReplyDeleteA beautiful waterfall card. And, I love the gold embossing on the white which makes it so elegant looking. I only did one in my life and I recall it was a real struggle for me. So as much as I like them I will not attempt one.
ReplyDeleteWow - this is gorgeous!
ReplyDeleteBeautiful card-great technique!
ReplyDeleteBeautiful card.
ReplyDeletehugs