Hi STAMPlorations peeps! Maybe you saw the fun shaker card I created recently? Thought I'd share how I made it. I think the design is just plain fun, and with these stamps you could even use this design for an out-of-the-ordinary graduation card. And the bonus... you use up one of those backgrounds you made for fun but then don't know what to do with it ;)
STEP 1
Gathered my supplies - Wanderlust stamps, Crazy Double Running Stitched Rectangles, large versions of Wanderlust from the Stamp Lab, cardbase, a background panel, fun foam, acetate, sequins, glitter and glue.
STEP 2
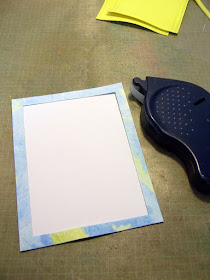
Die cut a rectangle out of the background panel. Mine is marbled with alchol ink, but you could use any that you have. Or patterned paper. Then also die cut two layers of fun foam to create two frames. Trim acetate to be a bit larger than the die cut area, but smaller than the full size of the card.
Die cut a rectangle out of the background panel. Mine is marbled with alchol ink, but you could use any that you have. Or patterned paper. Then also die cut two layers of fun foam to create two frames. Trim acetate to be a bit larger than the die cut area, but smaller than the full size of the card.
STEP 3
I roughly figured out my stamp placement. But since the stamps all extend off the panel, yet I wanted to use the MISTI corner to ensure the panel stayed put, I stamped the images one by one, turning the panel 90 degrees before aligning and stamping the next one. (If you want to stamp all images at once, you could put a sheet of paper in the MISTI and temporarily adhere the panel to the middle of the MISTI and then stamp. This should ensure that if you need to reink and restamp, the panel stays put.)
STEP 4
Temporarily adhered the frame to my cardbase. Used this to align the stamped panel correctly on the base to adhere it.
STEP 5
Adhered the acetate to the reverse of the frame and let dry. I used Multi Matte Medium.
STEP 6
Adhered the stacked foam frames to the cardbase. Use an acrylic block to weigh them down while they dry.
STEP 7
The final step is to fill the shaker with sparkly goodness and then adhere the framed acetate. Depending on how you want to include a sentiment - I stitched mine onto the frame - don't forget to do that before adhering the framed acetate to the card. Again, let it dry with weight on it.
Thanks for coming by today. Should you try out any of the techniques from our Spotlight posts, like making an easy shaker from a background panel, be sure to hook up at our Spotlight Project Showcase. Should you be placing an order soon (have you seen the new goodies in the store lately), I'd love it if you used my STAMPGIRLMARIA code for an additional 20% off!


This is such a fun card!
ReplyDeleteI agree about using the
fun foam-much easier!
Great result - I love it!
ReplyDeleteIt's a wonderful shaker card, loved the idea of putting backgrounds to use .
ReplyDeletesigh, love this Maria!
ReplyDeleteturned out lovely - tfs
ReplyDeleteso great card!
ReplyDeletegreat tutorial - thanks for sharing:)
ReplyDelete