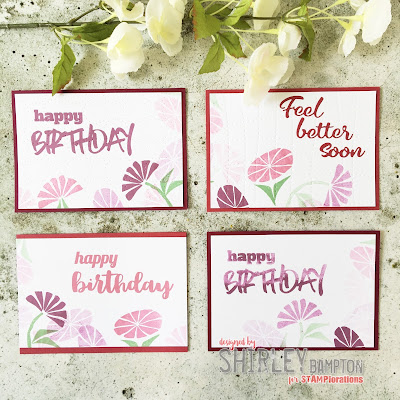
Hi peeps, I've been cards with my friend Michele aka I Card Everyone again, and this time our challenge was still to use the split four technique, but also to incorporate cover plates and to use my set Layered Citrus.
Well, you knew we wouldn't be making lemonade, didn't you?
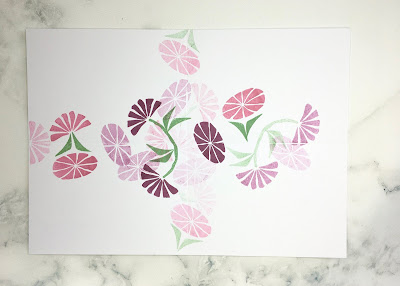
I started by building my split four sheet using the solid images from the set. The leaves and stalks were made using the rind and peel stamps (I stretched the rind slightly to make it straighter).
(apologies for the poor quality of the photo!)
Having cut the sheet into four, I set about making my cards. For this first one I added a sentiment from Happy Birthday in the same colour as the whole flower and trimmed the panel so that strips of the coordinating base card showed at the top and bottom.
On the next one I chose the other words from the Happy Birthday set in colours that matched the flowers on this section, then centred the panel on matching card.
Time to use the cover plates - this first one is Wonky Stitched Grid Texture Cover Plate. I used a crease mat so that it got a quilted effect rather than a cut effect. It actually feels as 'quilty' as it looks!
I added Feel Better Soon die cut in coordinating card.
My final card uses Circles All Over Cover Plate for soft circles on the background.
In order to get second-generation images, I stamped off first on spare card. By thinking about how I was stamping off, I ended up with panels that I'll be able to use to make even more cards - win, win!
I hope this helps you to look at some of your stamps in a different way, to see how you can stretch your supplies.
Pop on over to Michele's blog to see what she made of all those lemons and limes :) I'm off there now to take a look!
(apologies for the poor quality of the photo!)
Having cut the sheet into four, I set about making my cards. For this first one I added a sentiment from Happy Birthday in the same colour as the whole flower and trimmed the panel so that strips of the coordinating base card showed at the top and bottom.
On the next one I chose the other words from the Happy Birthday set in colours that matched the flowers on this section, then centred the panel on matching card.
Time to use the cover plates - this first one is Wonky Stitched Grid Texture Cover Plate. I used a crease mat so that it got a quilted effect rather than a cut effect. It actually feels as 'quilty' as it looks!
My final card uses Circles All Over Cover Plate for soft circles on the background.
In order to get second-generation images, I stamped off first on spare card. By thinking about how I was stamping off, I ended up with panels that I'll be able to use to make even more cards - win, win!
I hope this helps you to look at some of your stamps in a different way, to see how you can stretch your supplies.
Pop on over to Michele's blog to see what she made of all those lemons and limes :) I'm off there now to take a look!


A super idea Shirley
ReplyDeleteWow, what a great alternative use of the stamps. These are fabulous cards
ReplyDeleteStay safe
Blessings
Maxine
These are beautiful!
ReplyDeleteOooh, I love that quilted effect with the cover plate. I'll have to remember that technique when I just want the texture.
ReplyDeleteWhat an awesome way to use this set!
ReplyDeleteI need to give this a try. Love the idea of stamping a background sheet and then cutting it into four card bases!
ReplyDeleteGreat cards, The wonky stitched coverplate really looks like a quilt. Perfect for a Fell better soon card. Going to have to try that split four technique.
ReplyDeleteDELIGHTFUL cards!
ReplyDeleteThank You for sharing this fun technique :)
Nicje idea for the set. Great way to use it a bit differently.
ReplyDeleteI love how she used the stamps differently than they were intended.
ReplyDeleteI haven't heard of the split four technique before, so I was interested to see how it worked!
ReplyDeletewow, this is so very creative, I totally love it!
ReplyDeleteI really want to try this to get more cards from one technique-brilliant!
ReplyDelete