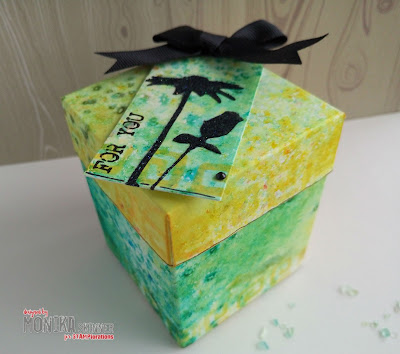
Hello Crafty Friends! Have you ever needed to make a box to fit a little gift? Well, I had this jar of chutney in need of a gift box, and I thought I'd share my process with you. I hope that my tutorial will help even novices to make their own boxes. Here it is:
I started off with measuring the diameter of my jar to give me the measurement for the sides and decided that they would need to be 7cm wide. This is also the measurement you'd need to calculate the base and lid sizes.
Next, I measured the height of my jar and decided that the box would need to be 8.5cm high.
I used a brusho background on A4 watercolour card which I made a while ago. It was easy to make. Simply sprinkle brusho powder on a piece of watercolour card, spritz with water, sprinkle with coarse sea salt and allow to dry. Once dry brush off the salt crystals and you'll have this lovely textured look.
For my box sides, I cut an 8.5cm x 29.7cm strip, the height (8.5cm) and 4x the width (7cm x 4 = 28cm) plus a little extra for the tab (1.7cm).
For the base, I cut a piece 8.9cm x 8.9cm, the width (7cm) plus extra for the tabs (2 cm; 1 cm for each side) squared. Due to the watercolour card being quite thick, I cut this piece slightly smaller (1mm) than my calculated measurement (9cm) for a better fit, normal card stock does not require this adjustment.
For the lid, I cut a piece 12.1cm x 12.1cm, the width (7cm) plus extra for the sides (5cm; 2.5 cm each side)) squared. This piece was cut a little wider (1mm) for a better fit.
If you measure in inches, you would add a little less than 1/16 inch for the lid size.
From the piece of left over card, I cut a small Manila tag.
For the base I scored 1cm down each side and for the lid 2.5cm.
Next, I added a subtle border using the Tribal Swirls stencil and scored the box sides strip at 7cm, 14cm, 21cm and 28cm, basically multiples of my 7cm width.
The tag got a little border too plus a couple of sparkle medium flowers. I first brushed some black Memento through the Bloom Silhouettes stencil for better coverage.
I then cut off the corners from my base and assembled the box and lid.
As you can see, the base sits inside the box with the sides wrapping around the tabs.
To finish the tag, I added doodles, a little sentiment, pearl and bow.
Here are a few more photos of the finished box and tag:
I hope you feel inspired to create your own made to measure box and share it with us either in our 'Paint It Red' February Challenge, if you used the colour red, or in our Never Ending Anything Goes Challenge, if you used at least one STAMPlorations product.
That's it from me for today. Have a lovely week!
hugs
Monika xxx
STAMPlorations Products Used:


Monika, that is fantastic gift box! Thanks for the tutorial.
ReplyDeleteYou make it look so easy - a great result!
ReplyDeleteSo beautiful :) thanks for the lovely tutorial.
ReplyDeleteThis is a fantastic box. Thanks for the tutorial.
ReplyDeleteThank you for the step by step on your very creative project x
ReplyDeleteits so beautiful!
ReplyDeletehugs