Hello STAMP friends! I recently got some Flexi Templates designed by my teamie Monika and I'd like to share some fun I had with them with you today in my Spotlight project. There are so many things you can do with them (check out my Tuesday inspiration posts this month for more ideas). Today I created a one layer card with lots of interest using the oval templates. Take a look.
STEP 1
Gather supplies - Cardstock, Oval Flexi Templates, Winged Things stamp set, distress oxides and sponge daubers. You'll need a sentiment too ;)STEP 2
Position the flexi template in the corner and your cardbase centered behind the template in the MISTI. TIP: Use tape or a magnet to secure your cardbase.
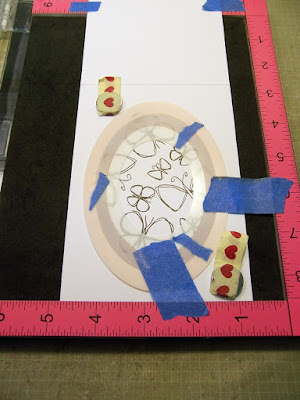
Add the next two inner ovals and secure all the pieces with some tape. Now you have your mask.
STEP 3
Determine placement of your images around the right side of the oval and stamp. Clean the stamps and do the same on the left side. TIP: If you choose a stamp set with multiple smaller images you can speed up the stamping process. I used four images and only had to stamp twice to fill the space.
STEP 4
Now you want to ink the "frames" around the images. I found the best way to do this was to place all the pieces back together, tape them, flip them over and carefully remove the piece where you want to ink - in my case the outer pink oval.
STEP 5
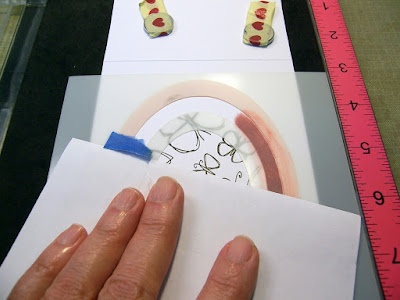
Using a sponge dauber, apply ink in the "channel" created between the masks. TIP: Leave the tape on one side as you ink the other. It helps keep everything in place Then flip the MISTI and remove the rest of the tape before inking. I used a piece of scrap paper over everything to keep from making smudges and also to apply some pressure to keep the whole thing in place while inking.
STEP 6
Now you want to add the inner "frame". Add the masks, tape them, flip them over, remove the one where you want to ink the darker color, put them back in the MISTI and apply ink.
STEP 7
I then decided I wanted to add a few butterflies outside the frames to make the card more interesting. So I lined up the masks again, placed them over the inked frames and stamped. I was pleasantly surprised that even with the thickness of the templates, I achieved a nicely stamped image with just one inking/stamping. I did make sure to apply pressure to all parts of the stamps, especially where they hit the template edges.
I finished it off with the heat embossed sentiment. I love all the depth on this nearly one layer card, don't you?
I hope I've inspired you to give the Flexi Templates a try. Should you find yourself placing an order anytime soon, I'd love it if you used my STAMPGIRLMARIA code for an additional 20% off your order.


Thanks for sharing how you made this pretty butterfly card.
ReplyDeleteI love the butterflies and how you used the ovals!
ReplyDeleteGreat idea share for the set. I like the use of the masks for the ovals.
ReplyDeleteI like the simple butterflies---no coloring. So pretty.
ReplyDeleteLove this! I am always looking for ways to make one layer cards that don't look so flat and boring. I think there are some templates in my future. LOL
ReplyDeleteVery cool effect you created with these stencils
ReplyDeleteWOW - what a great tool those flexiplates are!
ReplyDeleteStay safe
Blessings
Maxine
Awesome ideas and such a pretty card!!!
ReplyDeletePretty card! I love the style of the butterflies, and the Flexi-Templates look awesome!
ReplyDeleteThis is just wonderful!!
ReplyDeleteSo pretty, Thanks for showing how you created it. Love them sweet butterflies.
ReplyDeleteI love this whole look - so pretty!
ReplyDeleteLove your card, so pretty.
ReplyDeleteI haven't tried these yet. Nice work!
ReplyDeleteFantastic masking with the templates!
ReplyDeleteVery pretty!
I struggle alot with one layer cards, this is so beautifully made!
ReplyDeleteSo neat, I love it.
ReplyDelete