Hi STAMP peeps! I'm back again today, playing with the oh-so-fun Bloom Doodles and taking a look at color choices. Here's my card.
A one-layer card made by masking, stamping and Copic coloring. Keep reading if you'd like to learn about my process.
STEP 1
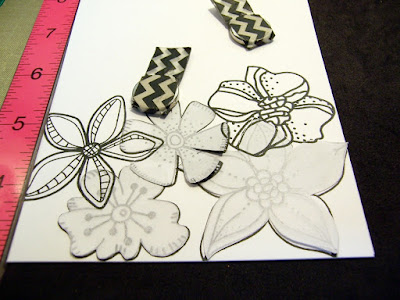
Gathered my supplies - stamps, a front panel and cardbase from Neenah 80 lb, Memento Copic-proof black ink, Copic markers. And well, the scissors... I had originally intended to fussy cut along the flowers at the bottom, but then liked the final result too much to cut into it ;)
STEP 2
Arrange the flowers to get an arrangement you like. At this point, also decide which blooms to have in the foreground (stamp first and mask) and which to have in the background (stamp second).
STEP 3
Stamp the two bottom blooms, making masks when stamping off the leftover ink. Fussy cut the masks, masks the blooms and stamp the third bloom. Make a mask of the third bloom, mask it off and stamp the fourth and fifth blooms.
STEP 4
I actually went back and created masks of the fourth and fifth blooms, put them down and stamped some branches and leaves to fill in the empty spaces (after I'd decided not to fussy cut the bottom edge).
STEP 5
Now the fun part! Remove the masks and appreciate the magic of masking. TIP: Store the masks on the acetate of the stamp packaging for future use. At some point they're ready for the bin. But not yet ;)
STEP 6
So about the color wheel. The three primary colors on the wheel are blue, red and yellow, right? Well, have you been clothes shopping lately? If so, you might know what I mean when I say I've seen an abundance of the fall tones of fashion - navy, brick red and mustard. I decided to capture these tones on my blooms to put an trendy edge on the blue, red and yellow theme.
I looked at my Copic marker chart...
and the B34 and B37 up top caught my eye. Since they're a bit subdued, I chose my second blue combo to be B91, B93 and B95, also "off" hues that are a bit lighter than the 34 and 37.
Then having my blues, I looked at the reds and chose R24, R27 and R29 - perhaps a tad too "bright" for my combo but my Copic selection is limited! Since red is the most powerful color in the trio I knew I'd only color one bloom red.
For the yellows I chose YR23 and YR24 as well as a second combo of lighter yellows from my Action Twinmarkers (45 and 49).
All lined up and ready to go!
To finish the card, I added a sentiment nestled into the blooms. Here's my finished card again.
Hope you enjoyed my tutorial today. I'll have another take on this idea in my next Spotlight post. Should you try out any of the techniques from our Spotlight posts, be sure to hook up at our Spotlight Project Showcase.
Should you find yourself placing an order soon, I'd love it if you used my STAMPGIRLMARIA code for an additional 20% off!


Fabulous tutorial Maria. Simply stunning result with those gorgeous blooms and the colours are amazing. Perfect choice of sentiment to go with them.
ReplyDeleteits stunning card!
ReplyDeletesuper pretty Maria...love those blooms!
ReplyDeleteLove those blooms and how you colored them!!
ReplyDeleteGorgeous work and Fabulous tute! Thanks! xoxo
ReplyDeleteThis is stunning! What wonderful work with those stamps and your markers beautiful! TFS
ReplyDeleteLOVE your gorgeous card, so pretty!
ReplyDeleteWow...Gorgeous arranged and Copics colored blossoms for your Stunning card, Maria. TFS your wonderful photo tutorial. Your masking turned out beautifully. Thanks for the tip on how to save masks:-) I now have this beautiful Bloom Doodles stamp set because of you:-) Hugs, Nancy
ReplyDelete