
I'm pleased to welcome the talented Ishani back here on the blog. What she did to our digital stamps is nothing short of amazing + she has a video wherein she demonstrates how she created her cards.


Hello, STAMPloration friends! I am Ishani and I am thrilled to be show casing digital stamps to you for the Digital Wednesday feature. I am featuring the beautiful floral digis, Boxed Blooms, and I am bringing some cool ideas for using and stretching them in some unconventional ways.
The Boxed Blooms is a set of 4 digital stamps and have some gorgeous illustrations of flowers: Rose, Daisy, Daffodil, and Orchid. I also have a You tube tutorial for the detailed process of how I made these cards. I am using all three mediums to color: Copic, colored pencils, and watercolors! I printed my digis from an ink jet printer. Also I tried to use colored cardstock for my cards today, which is a great way to get more interest on your cards.
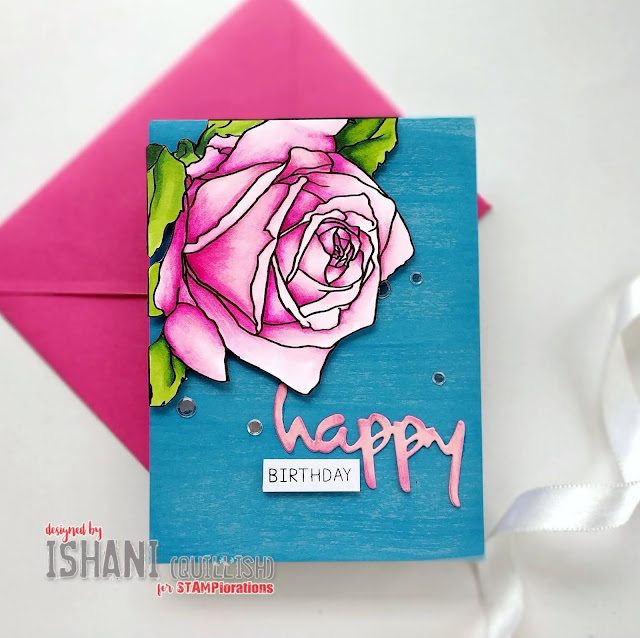
For my first card I chose the Rose stamp and resized it to be a big bold flower to cover 2/3rd of my front panel. I love big bold floral stamps but what I love about digital stamp the most is that you can resize it to the proportions you want!
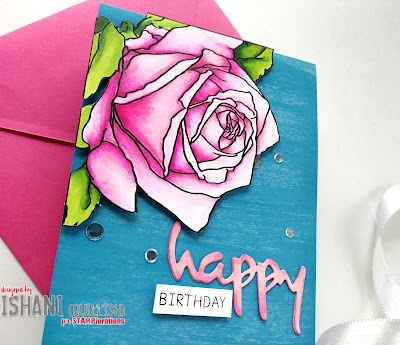
I printed my Boxed Rose Flower on 110 lbs Neenah Solar white paper cut it in a way that the box doesn't remain and it looks like it was single rose image and then I colored with Copics. For the back panel I chose a blue cardstock and swiped horizontally Distress oxide in Blueprint Sketch for some texture but still a clean look. Then I used the Happy word die and cut it from a pink cardstock and sponged a little Picked Raspberry Distress oxide at the edges. Stamped birthday on a white cardstock and adhered the rose and birthday on foam tape and happy die cut with with glue on my blue card base. Some sequins to bling it up and here's a gorgeous bold rose card.
*****
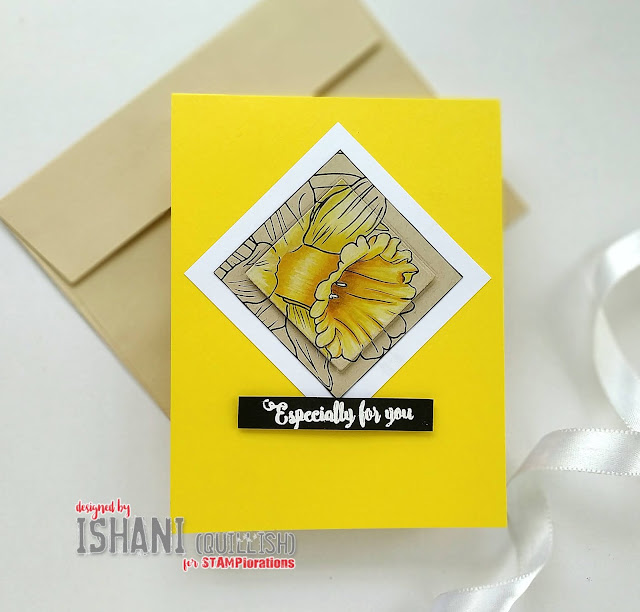
Daffodil on Kraft - Spotlight Stamping
How often do you print on kraft cardstock? I love the variation it gives and thought let me share this idea with you. Also why not do some Spotlight or Highlight stamping with digital stamps?
I printed the Daffodil Boxed image on kraft paper. I used Neenah's Desert storm paper for this and before I colored the mage, I used a square die to cut it through my image.
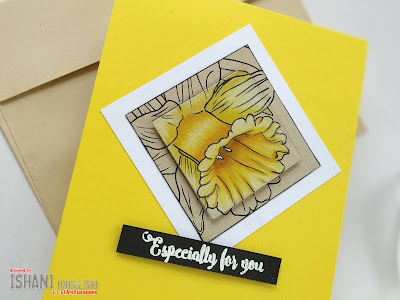
I coloured my image with Copics and colored pencils and left the outer square uncolored. I thought of putting it like a diamond shape and used a yellow cardbase and a square white matting for the kraft square. I adhered the uncoloured square with glue and popped up the colored square on foam tape. I used a sentiment from the Country Rustic stamp set and heat embossed it in white on a black cardstock and mounted it on foam tape.
*****
Watercolored Daises with Mirror Stamping
My skills with computer are limited and I use Microsoft word and use Ink jet printer for my printing. But if you have done that you would know that the ink of the image bleeds when you use watercolors.
So how did I do it? I heat embossed my images! And how did I do that??
Now that I have your attention I would like to share that I also tried the mirror stamping technique with my images. I arranged my two boxed daisies together and then rotated one image so it looked different and faced the first daisy! So easy right? My video explains all the steps in details and if you did not understand, you can check it out.
For heat embossing and further watercoloring I chose a water color paper to print my boxed daisies on. Now this is what you have to remember, keep fans and choose a warm room for printing, preferably with no AC on. Be ready with your clear embossing powder and use an anti static powder tool on the correct side of the paper that will have the print coming out. As soon as the print is out, immediately put the clear embossing powder and then heat set it.
And tadddaaa.. you have the heat embossed images! Then I took my Zig colors and colored them. I used a black matting and foam mounted on a yellow cardbase and stamped thank you from the Frames and Flowers stamp set.
Hope you enjoyed the ideas and would try them yourself. If you would like to see more details of how I made this and some more photos then please pop on over to my blog here.
Wishing you a lovely day. Stay safe and healthy and keep crafting.
Hugs
~Ishani
Ishani has wonderfully showcased our digital stamps -- her cards are phenomenal! For a chance to win a $15 gift code to the STAMPlorations store, leave a comment here and on Ishani's blog by August 8. We'll announce the winner in the July winners post on August 10.
In the meantime, check out our re-opened digital store. We're regularly adding new images and right now, you can take 15% off your first order with the code DIGITAL15. And just for our blog readers and followers, purchase 4 digital products and get 1 free (up to $5 value). After placing an order, reply to the order receipt or send an email to stamplorations@gmail.com and indicate the digital product (valued at $5 or less) you'd like for free. You'll receive a special code to order the digital stamp you pick as your freebie for $0.
Big Bold Birthday Rose Card
For my first card I chose the Rose stamp and resized it to be a big bold flower to cover 2/3rd of my front panel. I love big bold floral stamps but what I love about digital stamp the most is that you can resize it to the proportions you want!
I printed my Boxed Rose Flower on 110 lbs Neenah Solar white paper cut it in a way that the box doesn't remain and it looks like it was single rose image and then I colored with Copics. For the back panel I chose a blue cardstock and swiped horizontally Distress oxide in Blueprint Sketch for some texture but still a clean look. Then I used the Happy word die and cut it from a pink cardstock and sponged a little Picked Raspberry Distress oxide at the edges. Stamped birthday on a white cardstock and adhered the rose and birthday on foam tape and happy die cut with with glue on my blue card base. Some sequins to bling it up and here's a gorgeous bold rose card.
*****
Daffodil on Kraft - Spotlight Stamping
How often do you print on kraft cardstock? I love the variation it gives and thought let me share this idea with you. Also why not do some Spotlight or Highlight stamping with digital stamps?
I printed the Daffodil Boxed image on kraft paper. I used Neenah's Desert storm paper for this and before I colored the mage, I used a square die to cut it through my image.
I coloured my image with Copics and colored pencils and left the outer square uncolored. I thought of putting it like a diamond shape and used a yellow cardbase and a square white matting for the kraft square. I adhered the uncoloured square with glue and popped up the colored square on foam tape. I used a sentiment from the Country Rustic stamp set and heat embossed it in white on a black cardstock and mounted it on foam tape.
*****
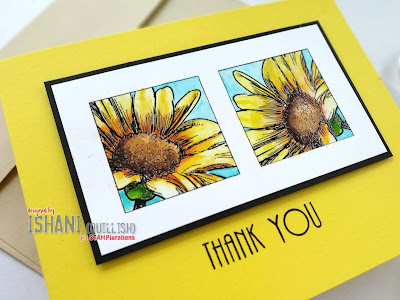
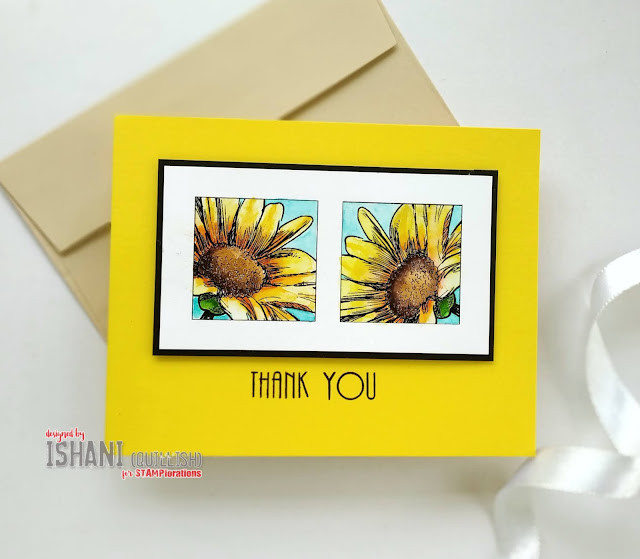
Watercolored Daises with Mirror Stamping
My skills with computer are limited and I use Microsoft word and use Ink jet printer for my printing. But if you have done that you would know that the ink of the image bleeds when you use watercolors.
So how did I do it? I heat embossed my images! And how did I do that??
Now that I have your attention I would like to share that I also tried the mirror stamping technique with my images. I arranged my two boxed daisies together and then rotated one image so it looked different and faced the first daisy! So easy right? My video explains all the steps in details and if you did not understand, you can check it out.
For heat embossing and further watercoloring I chose a water color paper to print my boxed daisies on. Now this is what you have to remember, keep fans and choose a warm room for printing, preferably with no AC on. Be ready with your clear embossing powder and use an anti static powder tool on the correct side of the paper that will have the print coming out. As soon as the print is out, immediately put the clear embossing powder and then heat set it.
And tadddaaa.. you have the heat embossed images! Then I took my Zig colors and colored them. I used a black matting and foam mounted on a yellow cardbase and stamped thank you from the Frames and Flowers stamp set.
Wishing you a lovely day. Stay safe and healthy and keep crafting.
Hugs
~Ishani
*****
In the meantime, check out our re-opened digital store. We're regularly adding new images and right now, you can take 15% off your first order with the code DIGITAL15. And just for our blog readers and followers, purchase 4 digital products and get 1 free (up to $5 value). After placing an order, reply to the order receipt or send an email to stamplorations@gmail.com and indicate the digital product (valued at $5 or less) you'd like for free. You'll receive a special code to order the digital stamp you pick as your freebie for $0.
There are so many fun ways to use digis and you've showcased three of them in gorgeous style! Love these cards!!
ReplyDeleteLove the way you use both kind of stamps (digital and physical)
ReplyDeletethese techniques are awesome, thanks for detailed explanation and videos too
not sure why my name is again not shown here, I am Neeti (Neeti.Dilliwar@gmail.com)
DeleteThanks for the great inspiration
ReplyDeleteyour cards are super sweet - thanks for sharing how you made them:)
ReplyDeleteThese are just gorgeous! I especially love the daisies!
ReplyDeleteWow beautiful cards! I especially love the boxed rose card!
ReplyDeleteWhat gorgeous cards and ideas! I LOVE the yellow with the boxes!
ReplyDeleteI like the way she colored the cards. So pretty.
ReplyDeleteI like the tips for use. Just getting started using these types of images, so the help is very much welcomed.
ReplyDeleteLovely cards and great tips for using digital stamps. I enjoy working with these so your ideas are appreciated...especially will try printing on the kraft cardstock. tfs-stay well.
ReplyDeleteYes, Ishani cards are amazing and beautiful...thank you so much for sharing them...
ReplyDeleteThese are gorgeous.
ReplyDeleteAmazing cards - Ishani is so talented!
ReplyDeleteStay safe
Blessings
Maxine
Three wonderful and very inventive cards, love them all and thank you for the ideas xx
ReplyDeleteGorgeous cards and I applaud your use of digi's. If there's resizing involved, I'm done. lol
ReplyDeleteGorgeous cards, Ishani!! I love the heat embossing technique in printing, never knew it! Thanks for the video :)
ReplyDeleteLove all of the inspiration and fabulous images! The Boxed Rose was my fav against that gorgeous blue bg!!
ReplyDeleteAwesome cards Ishani..love each one of them..
ReplyDeletestunning cards!
ReplyDeleteWow...Gorgeous cards...love the mirror stamping...
ReplyDeleteWonderfully done, Ishani! Thanks for showcasing 3 ways to use these gorgeous digi flowers!
ReplyDeleteHugs,
Deb
wonderful technique using these digi stamps. I really like the daffodil spotlight colouring one.
ReplyDeleteThese are absolutely gorgeous! I will be adding these digis to my wish list!
ReplyDeleteGorgeous cards!
ReplyDelete