



SHIPPING BREAK COUNTDOWN
Order by 5 PM Pacific Time today to have your order shipped before our break!
00 DAYS 00 HRS 00 MIN 00 SEC
Showing posts with label Maria Fischer. Show all posts

Sunday, August 23, 2026

Perfect Pairs, Expanded | Blooms & Sunshine with Maria

A coordinated collection can make cardmaking easier, but that doesn't mean you have to stop there.

STAMPgirl Maria takes Perfect Pairs: Blooms & Sunshine beyond the basic pairing by combining its stamps and ephemera cuts with other supplies from her stash. 

The result is a collection of projects that show how a Perfect Pair can become the starting point for a much bigger creative idea.


Take the Pair and Build on It

For her first card, Maria started with the “Sending You Sunshine” sentiment and let the word sunshine spark the direction of the design. Her thoughts moved from sunshine to rain, clouds, and sun rays, and although she initially planned a very clean-and-simple card, she decided to add a beautiful yellow flower and a wispy frame. She combined the Blooms & Sunshine with stencils (Almost Shattered and Make Marks), a cloud die, and the floral ephemera to create a cheerful card designed to brighten someone's day.

Creative takeaway: Let the words or imagery in your Perfect Pair inspire the direction of your card. You don't have to know the finished design when you start. Follow the idea wherever it takes you.


Build Around the Ephemera

Maria took a different approach with her second card, starting with the coffee-or-tea image from the Blooms & Sunshine ephemera. She paired it with the Dots and Beans stencil and the Crazy Double Running Stitch Rectangle die to create a layered background. The beverage in the ephemera piece even influenced one of her finishing details: when she realized it might actually be tea, she matched her splatters to the color of the drink. The result is a warm, playful thank-you card that would be perfect for a coffee or tea drinker.

Creative takeaway: Look closely at your ephemera for little details that can inspire the rest of your card. A color, image, or even a tiny element in the artwork can become the starting point for your background or embellishments.


Take It Beyond the Card

Maria didn't stop at cards. She also turned two pieces of Blooms & Sunshine ephemera into tags, using the coordinating stamps to create the backgrounds. On one tag she stamped the sentiment, while on the other she used the splatter stamp. It's another reminder that the pieces in a Perfect Pair don't have to stay confined to a traditional card design.

Creative takeaway: When you have beautiful ephemera and coordinating stamps, think beyond the card front. Tags, gift packaging, bookmarks, and other small projects can give those same pieces a whole new purpose.


One Perfect Pair, Plenty of Possibilities

Maria's projects show what happens when you treat a Perfect Pair as a starting point rather than a finished formula. The coordinating stamps and ephemera cuts give you a natural place to begin, but adding stencils, dies, and other supplies from your stash can take the design in an entirely different direction. You can follow an idea sparked by a sentiment, build a background around an image, or take the ephemera off the card altogether.

That's the beauty of the extended style: the pair gives you the foundation, and your stash gives you the opportunity to make it your own.


Discover What's Possible

Perfect Pairs: Blooms & Sunshine combines coordinating stamps and ephemera cuts to make it easy to create a cohesive design. But as Maria's projects show, you don't have to stop with the pair itself. Add a stencil. Bring in a die. Layer in other supplies from your stash. Or take the ephemera and create something other than a card. Take the pair and build on it. See where it takes you.

Explore Blooms & Sunshine and the other Perfect Pairs collections in the STAMPlorations store.

Until next time, keep creating, experimenting, and finding new ways to make your supplies work together.


Wednesday, August 19, 2026

Perfect Pairs | Blooms & Sunshine with Maria

Sometimes the hardest part of making a card isn't the actual making. It's figuring out what goes with what.

That's one of the ideas behind Perfect Pairs: coordinating stamps and ephemera cuts designed to work together, so you can spend less time sorting through supplies and more time creating.

Today, STAMPgirl Maria is showcasing Perfect Pairs: Blooms & Sunshine with two cards that show just how differently you can approach the same collection. Her first card came together almost immediately, while the second took a little more playing around to find the right arrangement.


Start with What Catches Your Eye

For her first card, Maria simply chose the two pieces of ephemera that caught her eye first and built the design around them. She tucked the coordinating sentiment between the two pieces and added a strip of washi tape along the right edge. That's it.

The result is a clean, balanced card that lets the beautiful ephemera take center stage. The coordinating pieces make it easy to create a cohesive design without needing to bring in a lot of additional supplies.

Creative takeaway: Sometimes the best place to start is simply with the piece you love most. Choose one or two elements that catch your eye, place them on your card, and let the rest of the design develop from there.


Give Yourself Room to Play

For her second card, Maria started with a single piece of Blooms & Sunshine ephemera and a sheet of lilac cardstock. She knew the elements she wanted to use, but it took some experimenting to figure out exactly how she wanted them to come together. She added a Double Running Stitch Rectangle die, an oval die, and a frame die to build the layered arrangement, creating a more structured design around the floral ephemera.

Unlike her first card, this one didn't come together immediately -- and that's perfectly okay. Sometimes finding the right composition means moving pieces around, trying different layers, and giving yourself permission to experiment before committing.

Creative takeaway: Not every card has to come together instantly. If you know the pieces you want to use but aren't sure how to arrange them, play with different combinations before gluing anything down. You may discover a layout you wouldn't have considered otherwise.


One Collection, Different Creative Paths

Maria's two Blooms & Sunshine cards show two sides of the Perfect Pairs experience. One came together almost instinctively: choose a couple of beautiful pieces, add the coordinating sentiment, and you're done. The other took more exploration and additional die-cut layers to arrive at the finished design.

And that's exactly what makes a coordinated collection so useful. The products take care of the coordination; you get to decide how simple or elaborate you want to make the card.

You can keep things clean and minimal, add your own dies and embellishments, or simply experiment with the pieces until something clicks.


Discover What's Possible

Perfect Pairs combines coordinating stamps and ephemera cuts into ready-to-use cardmaking combinations. The pieces are designed to work together from the start, making it easy to create cohesive cards while still leaving plenty of room for your own creativity.

Blooms & Sunshine is one of four Perfect Pairs collections currently available, along with Party & Wishes, Classic Christmas, and Serene Winter.

Whether you want to make a quick card or spend some time playing with layers and composition, Perfect Pairs gives you a beautiful place to begin.

Until next time, keep creating with confidence -- and let Perfect Pairs do the coordinating.


Monday, August 10, 2026

words that matter | INSPIRE + Artsy Abstract #2 with Maria Fischer

Sometimes the best cards really can be that simple: sentiment stamp + card front = handmade card.

Today, STAMPgirl Maria pairs Simple Expressions: INSPIRE with the bold, colorful Artsy Abstract #2 Card Fronts to show just how quickly that formula can turn into finished cards. In fact, one of these should have taken her just 4 minutes -- but a mid-card design change turned it into 8 :o)

But once you know where you're going with your design, these projects are a great example of just how quickly Simple Expressions and our ready-to-use paper goods can turn into finished cards.

Card 1: Four-Minute Simplicity

For her first card, Maria let the card front do nearly all the work. She stamped INSPIRE someone today onto a simple die-cut label, placed it over the colorful design, and called it done. This is exactly what Simple Expressions was designed to do: give you a strong sentiment that works naturally with our paper goods without requiring layers of additional supplies. And yes, Maria says this one really could have been a four-minute card...had she not changed her mind about the card base halfway through!


Card 2: Make the Sentiment Part of the Pattern

For the second card, Maria took a completely different approach. Instead of using INSPIRE once as a focal sentiment, she repeatedly stamped the solid word across the card front, alternating the direction to create another graphic layer within the existing design. An offcut black frame gives the repeated words structure and helps define the composition. It's a simple idea, but it completely changes the role of the sentiment. Instead of sitting on the design, the word becomes part of the design itself.


Card 3: Add Your Own Marks

For the final card, Maria again kept things wonderfully simple. She stamped INSPIRE someone today directly onto the card front and added a few white gel pen marks to some of the existing shapes. A black mat gives all those bright colors a crisp frame. Those tiny additions are enough to personalize the printed card front without covering up the artwork that made it appealing in the first place.


Creative Takeaway

Maria's three cards are a great reminder that quick doesn't have to mean repetitive. Use the sentiment as your focal point. Repeat it to create a pattern. Add a few hand-drawn details. Use a leftover die-cut or frame from another project. Small choices can give the same stamp-and-paper-goods combination completely different personalities.

And Maria did the math for us: at roughly four minutes per card and eight card fronts in a pack, you could theoretically turn an entire pack into eight handmade cards in about 30 minutes. Not too shabby :o)


Discover What's Possible

Simple Expressions stamps were designed to make creating easier: meaningful words, versatile sentiments, and plenty of ways to combine them with the paper goods already in your stash.

Pair INSPIRE -- or any Simple Expressions set -- with Card Fronts, ATCs, Collage Sheets, Pocket Backdrops, or Ephemera Cut-Out Sheets and see how much you can create without making the process complicated.

Until next time, keep creating with words that matter.


Friday, May 08, 2026

Creative Tip of the Day: Softening Negative Space

Today’s inspiration comes from STAMPgirl Maria, who shows us how to give a stenciled background a softer, more integrated look. If you find that the white space of your cardstock feels too stark against your stenciled pattern, this "post-stenciling" blend is the perfect solution.


The Technique: Softening the Negative Space

Instead of leaving the areas under the stencil crisp white, Maria toned them down after removing the stencil. By using the ink already lingering on her brushes, she created a soft, hazy background that bridges the gap between the bold pattern and the card base.

Sunday, April 26, 2026

Creative Tip of the Day: Building Bold Sentiments with Stacked Die-Cuts

In today's Creative Tip of the Day, we’re looking at a vibrant, high-energy card by Maria Fischer that perfectly demonstrates how to balance bold stamping with architectural die-cuts. Whether you're creating for a birthday or a masculine-themed occasion, this "stacked" technique is a wonderful way to add instant impact to your designs. 🌸✨

🌟 How to Elevate Your Sentiments 🎨✨


Sunday, April 19, 2026

Creative Tip of the Day: Mixing Media with Coloring Pages

Last month, we started a new series of Creative Tip of the Day posts on Instagram featuring classic projects by our amazing STAMPgirls In that series, we break down a beautiful project into simple, actionable steps, providing that quick spark of inspiration you need to get creating! Starting today, we're bringing these tips to the blog so they have a permanent home for you to reference whenever you’re at your craft desk.

Today, we are diving into a vibrant, multi-layered masterpiece by STAMPgirl Maria Fischer. Maria shows us how to elevate a coloring book page by treating it as a piece of artistic patterned paper rather than just a canvas to be filled.


Friday, March 27, 2026

🌸 Spring Into Cards: New ATC-Size Focal Points with Maria! 🌸

Hello, STAMPfriends! Today, we are exploring how to use our small-format papers to make a massive impact on full-sized card designs. The talented Maria is here with three stunning cards featuring our brand-new spring-themed ATC packs: Color Me Spring and Retro Femme!

Let’s see how Maria worked her magic:

Sunday, March 15, 2026

⚙️ Urban Edge & Artistic Flair: Maria Creates 3 Cards with Analog Grunge 🐦🎨

Who says grunge can't be gorgeous? Maria is here to show us that a little "grit" goes a long way! 🙌 Using the textures of the Analog Grunge collage paper pack, she has created three cards that perfectly blend industrial patterns with whimsical design. 🏗️✨

By pairing these edgy papers with STAMPlorations dies and stamps, Maria has created a look that is modern, bold, and totally unique. Let’s take a look.

Tuesday, February 24, 2026

Vintage Vibes & Bold Strides: Exploring Analog Grunge with Maria Fischer ☕📷

If you thought our new collage papers were just for card backgrounds, Maria Fischer is here to blow your mind! This week, Maria dove into the Analog Grunge pack—the third installment in The Artistic Crafter’s Collage Paper Anthology, Vol. 1—and the results are nothing short of spectacular.

✨ Analog Grunge: The Anthology's "Cool Kid" ✨


Thursday, March 10, 2022

{Spotlight Project} Maria Revisits Scrap Strips


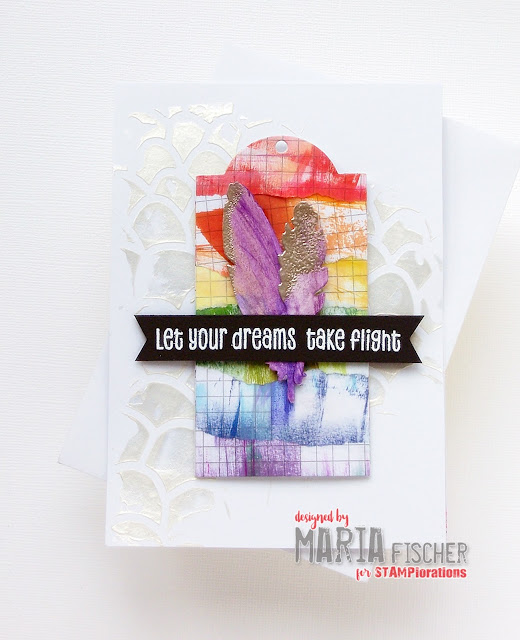
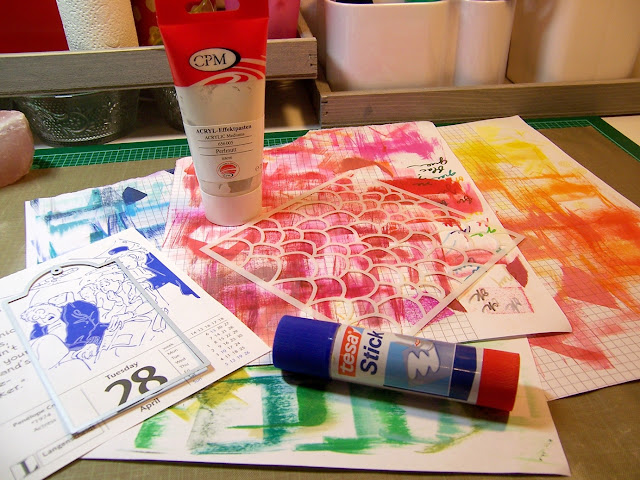
I'm back again this month still talking about scrap strips. This time I took some scrap paper I'd used when swiping ink pads directly onto my ink swatches. In the past I'd always stamped a solid image onto my swatches but I've decided I like the color swiped onto the swatch so I've been updating them. I have a lot of inks. A lot. All that yummy color? I just had to make something with the prettiness.


STEP 1

Gather supplies - I grabbed the swatching scrap papers with all their prettiness, a piece of scrap paper to glue them onto, a glue stick and a tag die. I also wanted to add some texture paste through a stencil onto the cardbase. The rest I figured out as I went along...


STEP 2

Tore some strips in ROYGBIV order and glued them onto my scrap paper. Notice I'd traced the die onto the scrap to give me a good idea of where to place the strips.


STEP 3

When the glue was dry I die cut the tag. TIP: Rather than throwing all of the negative piece away, I trimmed off a strip of it to adorn the inside of my card ;)
I also die cut three tags from scrap cardstock to stack before adhering the tag to my card front.


STEP 4

I snazzed up my card front with some shimmery paste through this fun stencil. I did not cover the entire front, just three random areas. TIP: Be careful not to place your stencil in the wet paste when you move it around.


Here's the finished card again. I gussied it up with a couple feather leftovers from my scrap drawer. Rainbows. Aren't they the best?


Tearing up scraps or backgrounds you've made is another great way to put them to use in your cardmaking. As always, if I inspire you to place an order in the shop, I'd love it if you used my STAMPGIRLMARIA code for an additional 20% off at no extra cost to you.


Thursday, February 10, 2022

{Spotlight Project} Maria Has Die-cutting Fun With Scrap Strips


Well friends, I have a luxury problem. I get to move my crafting from my basement laundry room to DD's old bedroom. Woohoo! Daylight! But let me tell you, I am totally overwhelmed. How to make it perfect? And boy do I need to purge.

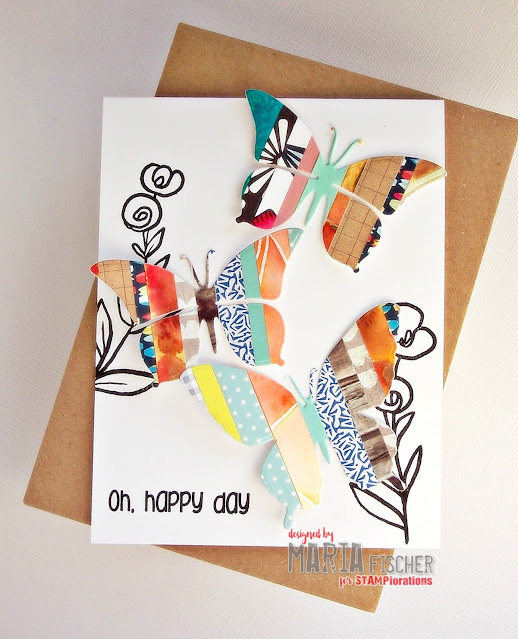
So when I find myself unable to deal with the ginormity (is that a word?) of it all, I submerge myself in little projects. One of which was tackling my bucket of scrap strips. You know the ones you cut off the bottom of a card or a background you made or a piece of PP. I had a blast just adhering those strips to a piece of scrap paper then decided to do some fun die cutting with them. Speaking of fun, have you ever listened to Carissa W. podcast? She's full of cardmaking tips and reminds us to have fun in the craft room too ;) Let's get to my card, shall we?


Thursday, January 13, 2022

{Spotlight Project} Maria Gets A Start On Christmas Cards (By Recycling Christmas Cards!)


Happy New Year, STAMP friends!

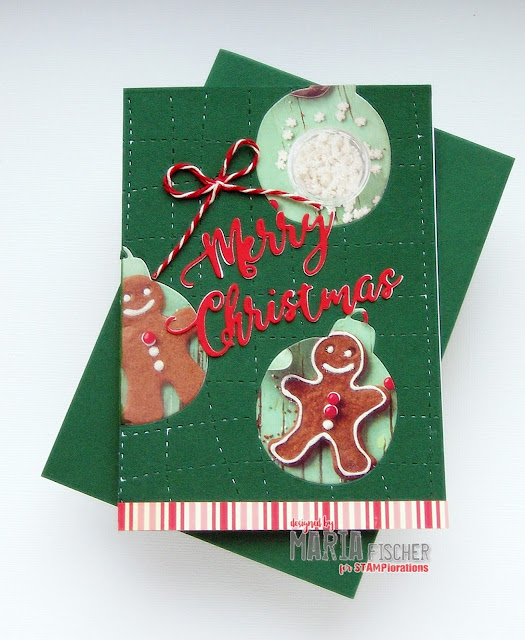
Here we go with another 365 day trip around the sun. Sure hope this year might bring a little more hope for all of us. Speaking of which, I "hope" you're not sick of Christmas just yet. Putting decorations away I just can't bring myself to trash beautiful received Christmas cards, can you? Today I'm sharing an idea for recycling them and letting their beautiful artwork shine on a handmade Christmas card that you can send next Christmas. Interested? I've made a few. Here's one.


Thursday, December 09, 2021

{Spotlight Project} Maria Uses Ephemera To Mass Produce CAS Christmas cards


Hello STAMP friends! Hope you're not sick of me and my ephemera yet. It's just such fun to let the cute pieces do the heavy lifting while you just add a little here and there. Ready for some super CAS versions? First I must apologize, the card pictured is not the card made in the tutorial. I ran out of good natural light for photos. But the concept is totally the same. Please come by my blog  for the rest of the lineup - I had 8 pieces of ephemera to use up ;) So this tutorial covers the production line approach to making these clean and simple cards. Shall we get to it?


Thursday, November 25, 2021

{Spotlight Project} Maria Uses Ephemera ATCs For Quick And Easy Christmas Cards


Hello STAMP friends! Do you make your own Christmas cards to send? If so maybe you're already done making them, but if not I've got a super easy way to create a Christmas card with a fun factor. And to do some recycling ;) Let's get to it.


Thursday, October 21, 2021

{Spotlight Project} Maria Uses The Spotlight Technique With Ephemera


Hello STAMP friends! How are you enjoying the newest addition to the STAMP family - Paper Goods, specifically Ephemera? I tried the spotlight technique with one of the ATCs for today's post. Let's take a look.


Thursday, June 10, 2021

{Spotlight Project} Maria Makes A Masterboard With Flexi-Templates - Part 2


Hello STAMP friends! I'm back today with with two more cards made with my masterboard I created with Flexi Templates. I hope you saw my last Spotlight where I created the masterboard and then made two cards with half of it. Today I'm sharing the other two cards.


Thursday, May 13, 2021

{Spotlight Project} Maria Makes A Masterboard With Flexi-Templates - Part 1


Hello STAMP friends! I'm back today with another idea for using your Flexi Templates. I hope you saw my Tuesday inspiration posts in April for ways to use them. Today I created a masterboard with the oval templates and was able to then create four cards out of it. Here are two cards. Let's have a look.


Thursday, April 08, 2021

{Spotlight Project} Maria Makes A One-layer Card With Flexi-Templates


Hello STAMP friends! I recently got some Flexi Templates designed by my teamie Monika and I'd like to share some fun I had with them with you today in my Spotlight project. There are so many things you can do with them (check out my Tuesday inspiration posts this month for more ideas). Today I created a one layer card with lots of interest using the oval templates. Take a look.


Thursday, March 11, 2021

{Spotlight Project} Maria Takes A Texture Cover Plate Up A Notch


Hello there STAMP friends! I have an idea for you if you'd like to stretch your stash a bit. Do you have one of those cool cover plate dies which impresses an image into a piece of cardstock? I was inspired by Elisabeth's cool card and created a similar look.


Thursday, February 11, 2021

{Spotlight Project} Maria Takes A CAS Design Up A Notch


Hello there STAMP friends! Back with another tutorial for you. Today I'm sharing an idea for those of you who like to make super CAS cards. Something to think about if you want to take it up a notch ;)