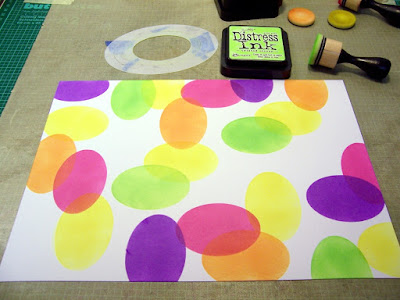
Hello STAMP friends! I'm back today with another idea for using your Flexi Templates. I hope you saw my Tuesday inspiration posts in April for ways to use them. Today I created a masterboard with the oval templates and was able to then create four cards out of it. Here are two cards. Let's have a look.
STEP 1
Gather supplies - Cardstock, Oval Flexi Templates, Art Marks stamp set, a rainbow of distress inks and sponge daubers. You'll need a sentiment solution too ;) My idea was to use a rainbow of colors to ink ovals all over the 8 1/2 x 11" piece of cardstock.
STEP 2
To give myself a bit more safety zone so I wouldn't get the ink outside of the central oval, I took the three ovals and secured all the pieces with some tape. Voila! A mask.
STEP 3
The only thing slightly tricky about my project is "mud". You don't want to create mud. In other words, you need to consider the color wheel and consider the placement of the colors of ovals overlapping. If, for example, you ink orange over a blue oval... hello mud. TIP: Start with yellow (in the middle of the rainbow) so you can think a little about the colors you'll put next to it. Red (and orange) overlap fine with yellow as do green and blue.)
STEP 4
Now you basically go to town! Add those beautiful ovals of DI color. For those of you interested in the step-by-step, I've included the photos of the masterboard after the addition of each of the colors. I find more of yellow is always a good idea.
STEP 5
Review your work. It wasn't "full" enough for my liking so I decided to add some more ovals. TIP: Use only the primary colors, red, yellow and blue, since they are least likely to create mud when you're filling in the empty areas. But still consider overlap to avoid mud.
I added five more yellow ovals, overlapping any colors except purple.
And five more reds (avoiding green).
And then even two blues.
STEP 6
So. What to do with this lovely piece of cardstock? I cut it in half and pulled out Art Marks 2 and some black ink. If you're wondering, this is the right half of the piece above, rotated 90 degrees to the left. TIP: When random stamping a masterboard (or a half of it), consider the panels you will get from it. Notice the black rectangles... I took care to be sure there would be at least three spots of that solid black per panel.
STEP 7
Too much? Too little? You decide. I liked the touches of black but loved the white spaces left too. I cut this panel in half and made these two birthday cards, making my artsy, fartsy loving heart happy. (Notice the solid black rectangle shapes... 4 spots of it on the first, 3 spots of it on the second one.)
Perhaps I've inspired you to give the Flexi Templates a try, whether on a card or on a masterboard. I'll share my other two makes with you in my next Spotlight post. And should you find yourself placing an order anytime soon, I'd really appreciate if you used my STAMPGIRLMARIA code for an additional 20% off your order.


Wow, I would never think to use oval stencils to make a fun background like this. I'll have to remember the technique and give it a try.
ReplyDeleteI LOVE the bright colors!
ReplyDeleteThanks for sharing how to make these unique cards.
ReplyDeleteThat is a super fun technique
ReplyDeleteVery cool background with these stencils.
ReplyDeleteGreat background created with the method. Nice tip for mask use.
ReplyDeleteLove this! I gotta try it. Thanks for the inspiration. :D
ReplyDeleteThis looks like SO much fun, Maria - thanks for inspiring!!
ReplyDeleteFabulous work Maria!!
ReplyDeleteDefinitely not too much...these are awesome!!
ReplyDeleteBeautiful bright masterboard. Love this idea. Hugz
ReplyDeleteI absolutely love the pop of colour on these cards, these are awesome!
ReplyDeleteLots of possibilities with the templates! These look so fun!
ReplyDeleteWhat a fantastic way to make multiple cards. I love the bright colors!
ReplyDeleteLove the bright colors. Looks so fun to create.
ReplyDeleteAlways in for bright colors
ReplyDeletesuch a fun background
ReplyDeleteThey look absolutely amazing, can't wait to try the same idea, just waiting on my order then I will try this. Brilliant
ReplyDelete