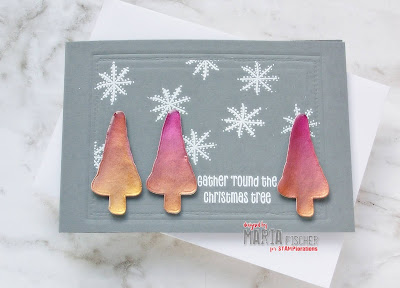
Hello there STAMP friends! Long time, no see. Hope your December is going well. I'm back with a Spotlight post for you today. It's a super fun way to stretch your stash by creating shiny DIY chipboard.
STEP 1
Gather supplies - I was in the mood for pink so I went through my scrap drawer for pretty pink. Chose this shiny, ombre flyer. A couple stamp sets, Trendy Christmas Trees (plus dies) and Winter Mug along with Rectangle dies. Can't forget Versamark, the UTEE (ultra thick embossing enamel) powder and white embossing powder.
STEP 2
Die cut three trees from the shimmery cardstock. It's so difficult to photograph. You see the shine better on the photo above actually. TIP: If using thinner paper, add a second layer of scrap CS or packaging to give your chipboard more stability.
STEP 3
TIP: With temporary adhesive add a strip of scrap CS as "handle" to your die cut to avoid burning your fingertips when using the heat gun. Ink front of die cut with Versamark and sprinkle on UTEE powder. If you don't have UTEE you can use clear embossing powder but you won't get that "enamel" look and feel.
STEP 4
Melt the UTEE powder with your heat gun. TIP: Get the gun hot. Apply the heat first to the reverse of the die cut to warm it up and make it stick. If you take the gun straight to the powder it may blow away. After about 15 seconds, apply the heat to the front top of the die cut and melt the power, slowly moving the heat downward.
Let it cool and then repeat the process to get a nice second coat of enamel onto your DIY chipboard.
STEP 5
Admire your shiny tree (middle). Compare it to the die cut before the UTEE shine (left). Love it. Go find some glitter cardstock to add UTEE to and love it even more (right)! Very difficult to photograph however.
STEP 6
Turn three shiny pink trees into a card by adding a dry embossed frame, some heat embossed snowflakes and a sentiment.
Here's another look at the finished card and a close-up of that amazing enamel shine on the DIY chipboard trees.
I hope your holiday preparations are coming along well, whatever that might mean this strange year! Should you find yourself placing an order anytime soon, I'd love it if you used my STAMPGIRLMARIA code for an additional 20% off your order


What a cool idea! Love what you did with the trees!
ReplyDeleteYou are so clever!! This is so great to add such fab dimension and shine!! Love these trees!!
ReplyDeleteVery pretty results. I haven't used my UTEE in a long time--I will have to pull it out.
ReplyDeletevery nice and great shine with that UTEE!
ReplyDeleteThis card is so pretty I love how that UTEE powder looks on the tree's
ReplyDeleteThis looks like a fun project! I love the tree shapes!
ReplyDeleteLove the Christmas trees! Fantastic card!
ReplyDeleteAdorable card!! Love using this technique; the trees are sweet.
ReplyDeleteGreat looking trees. I like the holder stip idea.
ReplyDelete