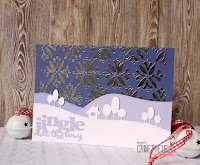
Hello crafters, Craftyfield here today for a new Mixed Media tutorial.
As it's nearly Christmas I thought I would indulge you with a technique that gives SHINE!!!
For the most reflective, metallic, shine foils are the best. Today I am using Hot foils, which require the use of a laminator. (I think it is possible to use an iron but I wouldn't risk it!)
Supplies;
Winter Flowers ARTplorations stencil
Jingle All The Way Phrase Die - CUTplorations
Gel medium (thick)
Hot Foils
First make sure stencil and card are securely attached to your work surface and apply some gel medium with a painting knife or spatula.
Although some brands market mediums specifically made for foiling, ordinary gel mediums work very well. Thick gel medium is my go-to for most applications and with stencils, it has the advantage of reducing the risk of seepage under the stencil.
Clean your stencil quickly and let the medium dry, overnight is best.
The next day cut a piece of foil to the dimension of your stencilled area and sandwich the card with the foil on top, shiny side up, in a folded piece of paper. I keep a piece of baking parchment with the laminator and always use it to avoid damaging the machine.
I cut the panel to size, added the die-cuts hills and sentiment and voila... The foil gives a mirror like finish which is difficult to photograph so here's a picture showing the shine:
***********
But wait! there is still foil on the sheet... and it's the reverse design of the stencil too! A shame to throw it away, no?
It's the perfect opportunity to make matching gift tags!
To lift the remaining foil you need double sided adhesive sheet and a piece of cardstock.
Fold back the liner of the double sided sheet and line up with the cardstock. Then you can remove the liner. You may use a bone folder to smooth out.
A bit at a time peal back the second liner, placing the foil on top of the adhesive, and smoothing it down with your hand.
Go over the whole card with a bone folder. Now the most difficult part! The foil sheet will stick to the adhesive sheet so removing the foil sheet might involve a lot of pulling, which you will see from the distressed state of the piece of foil below left!
With the (reverse) stencilled design transferred, only one more thing to do, as the areas without foil are still sticky... There are several options to do this:
- apply more foil(s) in a different colour
- add glitter, flock, mica powders etc...
- use talcum powder
For my make, since I had the laminator out and a scrap of laminating sheet, I laminated the sticky side.
Now both the foiled areas and the white areas are shiny which looks even better.
I die-cut 3 tags with the Tag O'Coffee
And a picture without the shine...
There you have, it positive and negative foiling with one stencil and a piece of foil! I hope you try this and come back in January for my final technique of the series.


Beautiful effects created with the foil.
ReplyDeleteLove the stencil and dies! Awesome card and tags!
ReplyDeleteOh wow, what a great use of the foil and some amazing results
ReplyDeleteStay safe
Blessings
Maxine
Thanks for sharing this idea, I never knew how to use foils with a laminator
ReplyDeleteCool. Thanks for the tips. Hugz
ReplyDeleteYou have inspired me to foil. I bought a laminator so I can do it, but I just haven't....I love your tag.
ReplyDeleteFabulous!!!! And such great results - love it!!!
ReplyDeletebeautiful tags! thanks for a great tutorial!
ReplyDeleteOMG! These are all beautiful! LOVE YOUR stenciling!
ReplyDeleteThese are great techniques & such a fun gift set!
ReplyDeleteSo pretty,have never used foil. Unfortunately I broke my laminate last year.
ReplyDeleteThese are amazing techniques.
ReplyDelete