

Happy Sunday, STAMPlorations friends! We are back with Trifecta Cardmaking, a fun feature wherein you'll see how the three S's in our line -- stamps, stencils, and stickers -- play well in cardmaking. STAMPgirl Sanna Lippert created a batch of fabulous monochromatic slimline cards featuring our products.


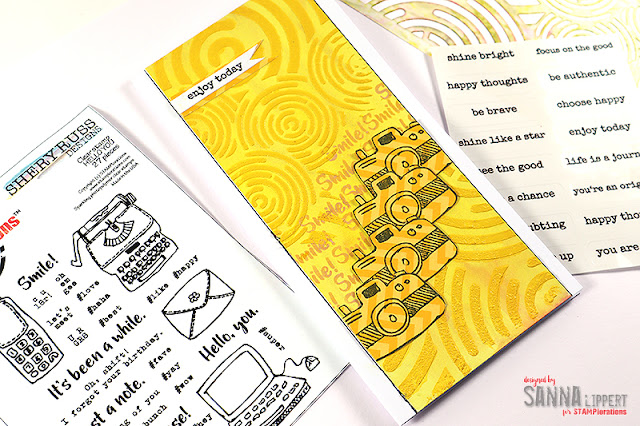
On my first card I used the Discs stencil with transparent gloss texture paste mixed together with Mustard Seed Distress Paint to create the texture to the card background that I had previously misted with yellow spray ink. Next I added stamping into the open area of the background using the Hello You stamp set and Fossilized Amber Distress Oxide. After that I took a piece of yellow patterned paper and stamped and fussy cut the camera images and arranged them onto the card background. The stamp set used here was again the Hello You set. For finishing touches I added a Shine Bright Clear Sticker sentiment that I had matted with the same patterned paper I used on the camera images. After finishing all the steps I adhered the paper onto a slimline sized card base and outlined the edges with a black pen for more contrast.
*****

On my second card I used the same Discs stencil with transparent gloss texture paste mixed together with Peeled Paint Distress Paint to create the texture to the card background that I had previously misted with kiwi-toned spray ink. Next I added some stamping into the open areas of the background using the Hello You stamp set and Mowed Lawn Distress Oxide. However, I didn´t like the look of it, so I changed my plan and just added more stamp ink with a water tank brush over the stamped areas (good thing, this ink is water reactive, so you can correct as you go!) to create different toned green areas to the background. I also did some paint splatters on top of it all with the Distress Paint tone I used with the paste previously. That adds nice contrast to the background and pleased my eye more than the randomly stamped sentiments! After that I took a piece of yellow patterned paper and stamped and fussy cut the camera images and arranged them onto the card background. The stamp set used here was again the Hello You set. For finishing touches I added a Shine Bright Clear Sticker sentiment that I had matted with the same patterned paper I used on the camera images. After finishing all the steps I adhered the paper onto a slimline sized card base and outlined the edges with a black pen for more contrast.

*****

On my third card I used the same Discs stencil with transparent gloss texture paste mixed together with Picked Raspberry Distress Paint to create the texture to the card background that I had previously misted with light pink-toned spray ink. Next I added some stamping into the open areas of the background using the Hello You stamp set and Bubble Gum mid-tone shadow ink. After that I took a piece of pink patterned paper and stamped and fussy cut the camera images and arranged them onto the card background. The stamp set used here was again the Hello You set. For finishing touches I added a Shine Bright Clear Sticker sentiment that I had matted with the same patterned paper I used on the camera images. After finishing all the steps I adhered the paper onto a slimline sized card base and outlined the edges with a black pen for more contrast.

*****
Here is a quick photo step-by-step for details:

Step 1: Add spray ink in green, pink and yellow tones to slimline size cut white cardstock.

Step 2: Mix Distress paint in Mustard Seed, Picked Raspberry and Peeled Paint with Transparent Texture Paste and apply thru the Discs stencil onto the backgrounds. Notice how everything is tone-in-tone for a more homogenous look. Also if you add the stenciling only partially, you can create a totally different background look!

Step 3: Now add stamping with the Hello You stamp set to the background using stamp inks in similar tones. I used Distress Oxide Fossilized Amber, Bubble Gum Shadow Ink and Moved Lawn Distress Oxide to add to the monochromatic look of the background.


Step 4: Stamp camera images on matching toned patterned papers and fussy cut them. Then arrange onto the card and adhere on place. Finish the pieces off with Shine Bright Clear Sticker sentiments and adhere the finished pieces onto card bases.
You now have yourself three monochromatic slimline cards created with Stamps, Stencils and Stickers and even though we used the exact same products on all three cards, the results are still very different due to the colors used and placement. Thanks for stopping by today - I hope I could inspire you to try out the 3S-combination yourself!! Have fun!
Love the background designs and colors! Great cards!
ReplyDeleteThese look amazing, great tip to colour the backgrounds too
ReplyDeleteThese are awesome! I LOVE the texture and stenciling!
ReplyDeleteSuper cute!
ReplyDeleteWhat a great stencil. It reminds me of the little plastic things we used to use on little records. I like how versatile it is. NICE
ReplyDeleteWow - a great combination of texture and repetition of a simple image to create a fabulous card - WELL DONE!!!
ReplyDeleteThose are great, Love the texture and colors.
ReplyDeleteI love the trifecta!
ReplyDeleteGreat to see some ideas on how to combine the sets. Nice step share.
ReplyDeleteThank you for showing the steps - you make it look doable! Beautiful cards!
ReplyDeletewow, great techniques!
ReplyDelete