Showing posts with label Boxed Blooms and Bold Sentiments. Show all posts

Tuesday, March 24, 2015

{Spotlight Project} Vicki Finds a Fun Inspiration


I have to chuckle - I went completely blank for today's spotlight. So I figured I can't be the only one that happens to - right? Right? Well, in my case, I have my trusty 1000 Bag, Tags & Labels go-to book.


This book is filled with fabulous inspiration for making cards. Case in point:


What got my attention was the splatter, and the CAS of the design.

Here is my set of cards I ended up making.


Thursday, February 19, 2015

{Spotlight Project} Monika Creates Scented Cards Using Homemade Embossing Paste


Hi, everybody. Today I'm having a play with homemade embossing paste and some of the ARTplorations stencils.

Making your own paste is a really good way to explore the use of embossing paste, especially as most of you will have the ingredients needed already at home. You simply mix some talcum powder with some PVA glue for a gooey consistency similar to a sponge cake mix, and you're ready to go. The added bonus is that it can make wonderfully scented cards as the perfume of the talcum powder will last for quite a while.

Here is my first card. It's actually my very first attempt at using homemade embossing paste:


Tuesday, February 10, 2015

{Spotlight Project} Vicki Creates a Triple Embossed Tile Card


Hi, everyone! Vicki here. Gosh, it seems like forever since I have had a project for you all. Today I will show you how to make a triple embossed tile.

Here is the finish card:


Thursday, September 04, 2014

{Spotlight Project} Monika Creates a Stationery First Aid Kit


Hello, everybody. I'm back again with some more inspiration for you. This week, I hope to inspire you to stretch your crafting skills and join me in creating this little handbag sized folder. It is a sort of Stationery First Aid Kit. 

I don't know about you, but I quite often get caught out in situations needing pen and paper, an envelope or just simply something nice to write some details on. Thinking that something has to be done about this whilst thinking about my upcoming Spotlight Project, it was a question of now or never!
So here it is, this Thursday's Spotlight Project using our current Stamp Club set, Bloom Sketches combined with Boxed Blooms & Bold Sentiments and Mini Mixed Media Backgrounds.


Wednesday, August 13, 2014

{Spotlight Project} Nonni Has Fun with Inks!


Hello, STAMPlorations friends! It's Nonni here playing with two great stamp sets: Boxed Blooms and Bold Sentiments and VIGNETTE: Art Deco Border Builders. I also used a stencil; they are very popular right now and really handy too -- there's plenty of stencils for sale in STAMPlorations shop here if you are looking for trendy stencils!

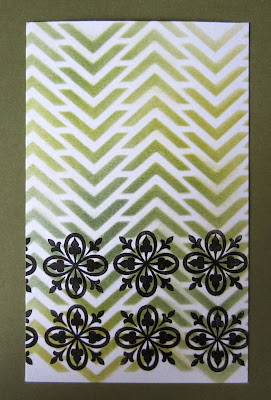
I began the background of my card with stenciling the chevrons with Stormy Sky and Crushed Olive Distress Inks using a blusher brush - fab tip from STAMPlorations DT girl Monika! It's easy to blend the colours with the brush (especially when using Distress Inks) and you get a very vivid final result. After stenciling, I stamped the images from VIGNETTE: Art Deco Border Builders with black Versafine: it's a very highly pigmented black ink and perfect for getting good coverage. Here's a photo of the background still in process:


After stamping the entire background, it was time to work on my sentiments. I decided to use Memento Drew Drops - they are very small and it's easy to ink just part of the word with one colour and then change to another colour without messing up! This could be done with bigger ink pads too but the cat eye shaped ink pads make it very easy. Here's a photo of the sentiment panel getting ready, the stamp is inked and ready to roll:


Background stamped, sentiment panel stamped...Time to put all the elements together! I added the doily because the overall look was getting overly green and made me think about jungle or the army... With the doily it became a feminine card for a green-loving girl - I might end up keeping it myself. :)


A piece of ribbon and some gems finished off this Spotlight Project. I'll end my post with a front view of my card and wish you a fun, inky week! 


stmp1053.jpeg   stmp1031.jpeg

Thursday, August 07, 2014

{Spotlight Project} Monika Creates a Layout with the Boxed Blooms


Hi, everybody. As promised some more inspiration for your fabulous Boxed Blooms and Bold Sentiments stamp set. I'm guessing that most of you have by now made it one of your faves.

Today, I'm working with the daffodil image. Well, one could say it's the wrong time of year, but it's never too late to catch up on some scrapbooking. And that's exactly what I've been up to.


To create this beauty you need:


- Stamps: Boxed Blooms and Bold SentimentsHoliday ArtsySENTIMENT BUILDERS: Celebrate,VIGNETTE: Celebrate Artsy, and Mini Mixed Media Backgrounds
- Inks: Black Memento, dye inks in brown, yellow, pink and blue
- Ink Markers: black, brown and dark yellow
- ProMarkers: tulip yellow, buttercup, gold, burnt orange, leaf green, pastel blue and blender
- Card stock: white sheet of 12x12" plus a piece of brown card for matting
- Tools: large soft brushes for blending inks (I used shaving brushes), craft knife, steel ruler and cutting mat plus colour spritzer/spray tool for use with markers
- Other: post-it notes for masking, sequins to add some sparkle

I started off by creating my masks for the daffodils and roughly deciding on the layout by placing my elements onto my 12x12" piece of card stock.


I then stamped the daffodils masking them off as I went along. With all three of them stamped and masked, I used my brushes to blend the inks (yellow, pink and blue) for the background.

I then stamped the large 'celebrate' (SB Celebrate) in brown followed by the splashes (Holiday Artsy) in yellow and pink before stamping the small 'celebrate' (Celebrate Artsy) in yellow, the word 'cherish' (Boxed Blooms) in brown and the smaller words (SB Celebrate) in black.

I then added a bit of background stamping (Mini Mixed Media) in pink and yellow. As I didn't want this to be dominant, I first stamped some ink off on a piece of scrap before stamping onto my scrapbook page. This type of generational stamping allows for a softer effect.

To finish off my stamping, I added a couple of brushstrokes (Celebrate Artsy) in pink to my bottom left daffodils, again using this type of generational stamping.

I then removed my masks and coloured my daffodils using my ProMarkers. I did this in a sketched style rather than focusing on perfect blending, which I think works well with this layout. I then cut around a couple of corners using my craft knife, added some splashes in brown and dark yellow and finished off by adding my matted photo and some sequins.

There is also a craft-along video which covers most of my decision making on the layout, masking and stamping in my usual casual style.


Hope you feel inspired to use your stamps in a different way.

Enjoy and Happy Stamping!!! :-)


Wednesday, August 06, 2014

{Spotlight Project} Shirley Does the Iron-Off Embossing Technique with the Boxed Blooms & Bold Sentiments


I'm thinking outside of the box again (quite literally this time!) with the Boxed Blooms and Bold Sentiments set. I've used the iron-off embossing technique to achieve a flat image that looks like it has depth and dimension, and extended the image beyond its frame.


I'm sorry I don't have a picture tutorial for you, but I got so carried away as I was making the card, I forgot to take step-by-step photos along the way! But it's a pretty straightforward procedure, so you'll be able to get the gist of it with these written instructions.

  1. Swoosh a card panel with anti-static bag.
  2. Stamp image with Versamark, apply clear embossing powder, and heat.
  3. Squidge some Distress Inks onto a craft mat or acrylic block. (I prefer acrylic block because it's completely smooth.) I used Peeled Paint, Worn Lipstick, and Dried Marigold.
  4. Pick up the ink with a wet paintbrush and apply as watercolours. The embossing acts as a barrier and allows you to flood and layer each section with colour, and you can tip the card as it's drying to help spread the layers into each other.
  5. Paint layers of colour around the outside of the box.
  6. Load the paintbrush with water and add to different areas of the border and you'll get paler areas. (Dab any areas that become too wet).
  7. When dry, lay the card face-up on a solid heatproof surface (I used an old melamine chopping board that I keep for such occasions) and lay a clean piece of copy paper over the top. Iron on a normal heat setting, (I found a regular iron, no steam, worked better than my craft iron). The embossing will melt into the copy paper leaving the stamped image on your card completely flat.
  8. Stamp a sentiment. (I used one from the Patchwork Frenzy: Graphic Squares set)
  9. Mount onto dark card then onto your base card. I used black to pick up on the sentiment.

Here's a close-up:


Check out your stamps to see if you have any framed images that you can extend. I just love colouring outside the lines!


Thursday, July 31, 2014

{Spotlight Project} Shery Makes Her Favorite Kind of Cards


Hello, fellow stampers! It's my turn to share a project this week. I'm back with another one layer card.

One layer cards are my favorite kind of cards to make but there's another reason I decided to make them this week: my craft area is still a disaster after 2 weeks. I bought crates and a 7-drawer rolling cart a couple of weeks ago. Unfortunately, I haven't made any serious progress in cleaning, organizing, and downsizing my craft supplies. My craft area is in shambles. Fortunately, I don't need much to make one layer cards...just stamps, inks, and post-it notes.

Here's my card. In addition to the Boxed Blooms & Bold Sentiments stamps, I used Vignette: Eclectic Florals and words from two Sentiment Builders sets, Happy and Thank You. (Shooting videos isn't possible until I could clear my craft table so a photo tutorial will have to do for now.)


1.
I stamped the daffodil three times on my card base,
stamping first in the middle and then with a post-it note,
I masked the image before stamping on the upper left and
lower right. I used jet black archival ink because I will be
watercoloring the daffodil in the middle. [You'll want to 
use ink that's permanent and waterproof for stamping if
you plan on using a wet medium later on.]

2.
Next, I stamped my sentiment. [Tip: If you are using
words from different sets, "audition" them before
stamping by laying them uninked on your card. Try different
orientations. In my card, I let the layout of the boxed
daffodils dictate how I would stamp the words. And
here's another tip: don't be afraid to mix and match different
sizes and fonts. Use the design principle of contrast: bold with
regular, caps with small caps, serif with sans serif, slab with script.]


3.
I then watercolored the daffodil in the middle with
Inktense Blocks. You can also use Distress inks for
watercoloring, but I find the Inktense Blocks to be
more vibrant, especially on cold-press watercolor paper,
like the one I used for my card base.


4.
I masked my daffodils with post-it notes before
stamping my flowers in Memento inks
(Lilac Posies and Bahama Blue).


5.
I added some spatters on my card and affixed a
couple of adhesive gems to the flowers. (I was lucky --
I found the gems in the plastic container that happened to be
on top of one of the empty crates.)

When I'm making one layer cards, masking is my favorite technique to use because it helps create an illusion of depth. 

Here's a second card I made using the steps above, only this time I went all black so the middle daffodil would pop. For texture, I used one of the stamps in the Mini Mixed Media Backgrounds. Instead of watercolor paper, I used 100# (270 gsm) premium heavy classic white card stock and Distress inks to watercolor the daffodil. 


I hope you enjoyed my short photo tutorial and that you were inspired by my cards. Why not try making a one layer card too? See you in a couple of weeks!


Wednesday, July 30, 2014

{Spotlight Project} Nonni Does DIY Card Bases and Heat Embossing


Hi,  stampers! It's Nonni here playing with Boxed Blooms and Bold Sentiments today!

If you are anything like me, you have lots of odd, small pieces of cardstock lying around... Some free space on my craft supplies shelf wouldn't hurt so I really want to get rid of some of those scraps! I came to think of making card bases out of scrap pieces and today I'm sharing my simple idea with you. 

Boxed Blooms and Bold Sentiments is the perfect stamp set to use in a simple card design like this and when you heat emboss your stamped images with white powder, it gives your card a very professional, stylish look! Here's a photo of the materials you need for the card above:


  • Cardstock pieces in colors that you like: my choice was to use a monochromatic color palette but you could use contrasting combos like blue and yellow or green with purple too!
  • Your chosen stamps from Boxed Blooms and Bold Sentiments
  • Embellishments of your choice
  • Versamark Ink, white embossing powder, and heat tool (not in the photo) for embossing. Using an embossing buddy will also improve your result by removing static from your card before the embossing process. If you are new to heat embossing, read about it for example here.

Cut the two pieces you want to use for your base cards to 10.5 x 14.7 cm or any measure you wish but these measures will form a basic A2 card. Cut the third piece to the same width and score it to form a hinge. After cutting the base cards I was lucky to have just enough of the darker card left for me to stamp and heat emboss the lily!


All you have to do then is to tape the base pieces to the hinge with double sided tape/glue. DIY card base is now done! :)


You already saw the finished card but here it is again with the heat embossed lily and the sentiment - the empty base does not look like much by itself, does it? :)


While I was at it I thought I'd make another thank you card. I have some of these long, narrow kraft card bases I don't really care for... So off I went cutting it to pieces to form a top-folding card! This time I used a scrap piece of patterned paper for the hinge. I heat embossed the daisy stamp and made a card with a touch of vintage. 


I hope I've inspired you to dig into your scrap pieces of cardstock: add some eye-catching heat embossing and no-one will think you were working with left-overs!


Boxed Blooms & Bold Sentiments