

Howdy, creative peeps! Sorry this spotlight project is a few hours late. I fell asleep editing the photos and writing up the tutorial. Seems to be the story of my life the last few weeks since I hit the third trimester. I feel all energetic one moment and then the next I'm zonked out in front of my desk. Thankfully, I haven't fallen asleep at the craft table holding scissors or with open ink pads and paints! :o)
Anyway, I had some mixed media fun earlier today in my brand spankin' new craft area (woohoo!). Yesterday Maria shared the fun sloshing technique for coloring images. It's a cool technique if you're not really into coloring with markers (or you're not that confident about coloring). Today I thought I'd share another technique on working with outline images and giving them color without really coloring them. (Besides, I wasn't up to playing with my markers today.) Here's the card:

I started with white card stock I cut down to 4.25" by 5.5". Because I knew I was going to use a lot of different mediums, I went with thick card stock -- 165# (446 gsm) -- so it wouldn't buckle much. With an old gift card, I applied white gesso.

After the gesso dried, I scribbled some Gelatos. I used Pistachio, Mango, Tangerine, and Lemon.

Then I spritzed water and let the colors blend. I tipped the panel this way and that to let the colors run.

I randomly stamped on the panel once it dried. I used various stamps from Mixed Media Grunge, Big Numbers Background, and Blossom Like a Butterfly (a new STAMP Lab set) and stamped them in Memento Luxe Rich Cocoa and then heat set.

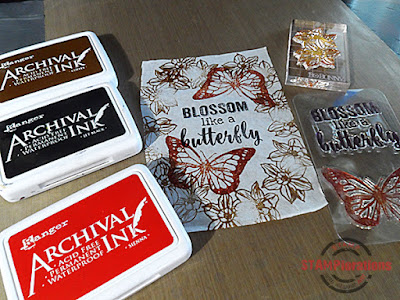
I have tons of scrap tissue paper so I took one and cut it down to roughly about the same size as the panel. I stamped the sentiment in the middle in black archival ink, the daffodils (from The Birds and the Blooms) in coffee archival ink, and the butterflies in sienna archival ink.
I adhered the tissue paper onto the panel with matte gel medium. I also carefully applied a layer of the gel medium over the tissue paper. Because the tissue is thin, the colors and stamped images underneath will show through. This is what gives the stamped images on the tissue paper color without you having to color them :o)

I partially stenciled (using the ARTplorations Gridlocked stencil) over the panel with modeling paste.

Then I watercolored some of the "bricks". I simply let the watercolors drip down.

When everything was dry, I used foam tape to mount the panel onto the card base. I ran the side of my Japanese watercolor brush pen along the edges to finish the card. Here's the finished card again.
I hope you enjoyed my mixed media card tutorial. See you in a couple of weeks!

Products Shery used in today's project:


Prize alert! Leave a comment in this post for an entry to our Spotlight Projects random drawing for June. We'll pick ONE (1) commenter to win a $10 gift certificate or her choice of 1 ARTplorations stencil. We'll announce the winner on the first week of July!
I love this Shery...note to self - must make use of my gelatos!! Looking forward to using this stamp myself, it's on my wanted list! Carol x
ReplyDeletevery beautiful!! worth the effort!!
ReplyDeleteGorgeous card! I love these bold colours! I enjoyed seeing how this evolved!
ReplyDeleteLoving this! Love the artsy techniques you've used, Shery! And yet another stamp set I'm going to NEED :)
ReplyDeleteStunning! love the gelatos BG and how clevelry & beautifully used the stamped tissue paper, wanna love it!!! Its a fun technique and must try!
ReplyDeleteThis is wonderful and the tutorial is brilliant! Now I know what to do with the gelatos.
ReplyDeleteElaine
WOW - Sheri this is amazing, and inspiring!
ReplyDeleteBlessings
Maxine
Wow!! Amazing card Shery! Love that stencil used and superb texture and use of gelatos!! Stunning! :)
ReplyDeleteSuchi xx
Brilliant, awesome colours and whole concept of the design is fabulous. I also want to thank you for my stamps which arrived, now I want to get using them.xxxx
ReplyDelete{aNNie My Personal Blog}
Loving thr bright hot summer colours. Still waiting for warm weather to come for more than an hour or two. They say next week. Believe it when it happens! Take care. Hugz
ReplyDeleteThis is amazing ! The stamped background showing throw the tissue is very interesting ! Thanks for the tutorial :)
ReplyDeleteThat is so cool and a great projcet for your new craft area!! I love how you have the color underneath and stamped on the tissue paper and the color shows through. Very cool!!
ReplyDeleteOh dear me. Another cool technique to add to my growing list. That tissue paper just melts into the background creating this fabulous look...kind of ethereal.
ReplyDeleteOh dear me. Another cool technique to add to my growing list. That tissue paper just melts into the background creating this fabulous look...kind of ethereal.
ReplyDeleteWow! This is amazing!
ReplyDeleteThank you for the step by step instructions. I'm still hesitant about "getting my fingers dirty" with mixed media. One day ... one day! Love the card!
ReplyDeleteWow! This is amazing!
ReplyDeleteWhat a great vibrant card! So sunny; looks like it want to came out of my screen... :) Hugs, Gerrina
ReplyDeleteI never would have thought of using tissue paper. Great idea.
ReplyDeleteI love the colors.
ReplyDeletewoowwww so many steps dear Shery
ReplyDeleteand all is amazing step
will follow your instruktion to make similar like this
this is AMAZING
love the partial embossed area
hugs
Monika
I'm glad you're getting some naps, my friend, even if they happen at 'odd' times! You need all the rest you can get, because Baby Girl sounds rambunctious! Your card: oh my gorgeous! The techniques are amazing, but I'm fixated on that new butterfly. On. my. list! WOW!
ReplyDeleteHugs~c
Wonderful techniques to create a one of a kind masterpiece! Thank you for sharing "how to".. this is gorgeous!
ReplyDeleteAmazing and pretty - love the butterfly!!
ReplyDelete