


Project 1 - Love in the Air Tag

This tag is cut in white card stock, using the ATC Tag Builder die set. I chose the hexagon-shaped top and horizontal tag hole for this project. The polka-dot kite is made with the rectangle in the tag set and I folded and glued in the 2 corners in at the top to form a triangle. I trimmed the bottom of the rectangle at an angle to form a kite. The blue cloud shapes are from the Clustered Hearts die set, glued to a small strip of paper on the back to keep small pieces in place.

With a scrap piece of paper, I cut a rounded tag topper as a stencil, and laid it out in various positions on the tag. Taking a sponge, I used Tumbled Glass Distress Ink to make a cloud pattern in the background. It turns your die cuts into stencils! Then in black, I cut l-o-v-e from the Lowercase Alphabet plate die and added it to the tag.
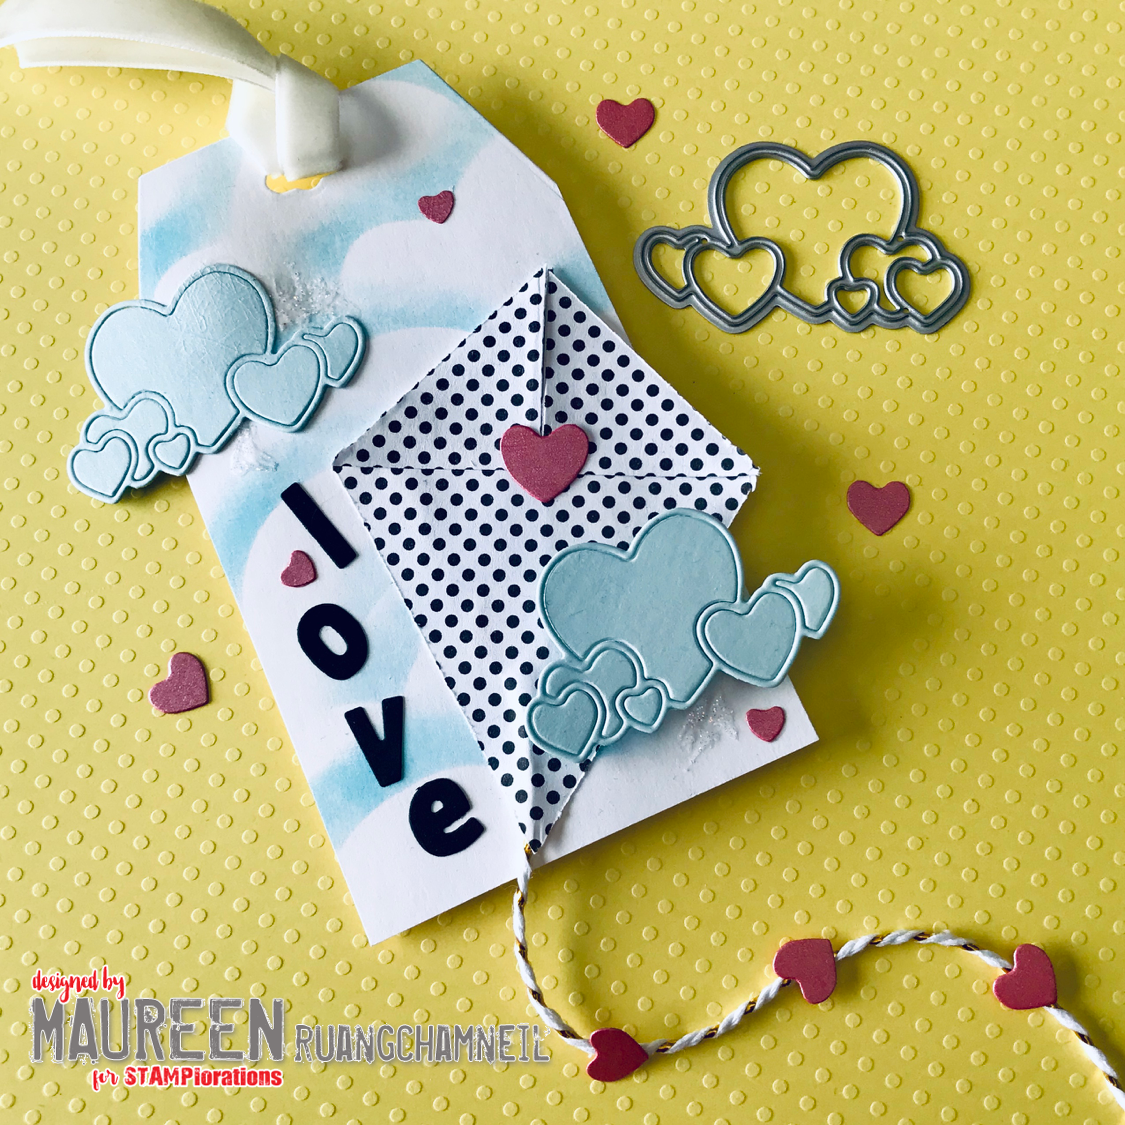
The clouds, kite and letters were attached with glue, and the bottom cloud is secured with a pop dot. A few more pieces from the Clustered Hearts die in pink, a twine tail for the kite, some Stickles glitter and a velvet ribbon topper were added and now the tag is ready for any gift-giving occasion!
*****
Project 2 - Camera Gift Card Holder
Coffee Petites with CUTplorations Stitched Circle Die

I've been wanting to do a camera project for a while now, and the ATC Tag Builder set is so perfect for this! There are only a couple cuts to do, so you can make extras easily when you need them. I started with a strip of yellow checkered card stock and used a scoring tool for a clean fold in my paper.

Once you fold your paper, set the rectangle in the ATC Tag Builder set slightly over the edge of the fold. Run it through your machine and it will avoid cutting the folded edge, leaving you with a card. I cut a hexagon edge for the gift card topper, and taped it to a gift card. With a trimmer, I added a small black rectangle to look like a camera flash. You can set the gift card inside the fold, or if you'd prefer, add an inner pocket too.

For the front, I cut coordinating strips of paper to match the length of the card front - one in white, and a thinner one in a colorful stripe. The green camera buttons are holes from the tag topper set. I needed a cute lens for my camera so I found that the Stitched Circle Die in the Coffee Petites kit is truly the perfect size for this! I secured the lens with a pop dot, dusted the edges with brown chalk and added highlights in white gel pen. It's insta-magic!
*****
Project 3 - Journal Page Border and Paper Clip Page Markers

For the border of my journal page, I cut a strip of gray polka-dot paper and the scalloped edge from the ATC Tag set. Using the Clustered Hearts Die, I cut 3 sets of pink and buffalo plaid paper and assembled the hearts and inner pieces across my gray border. One of the smaller hearts is secured with a pop dot for dimension, and I finished it off with a black gem in the corner.

For the page markers, I trimmed various strips of paper down slightly smaller than the width of my paper clip and to a length that would fit my journal. This time I chose the "curly bracket" edge (official term!), trimming off the bottom of my paper flag. I folded the straight edge over the paper clip and glued it to the back.

And the best part - the decorating! I used the Lowercase Alphabet letters in pink, black and silver. Representing each month is a various flower, sticker or small die cut piece, including more scalloped borders and hearts. Tying a small ribbon to the edge of the clip completes the look. This will add so much more joy to your plans for the new year, don't you think?
Very clever projects from Maureen! I especially love the camera!
ReplyDeleteWhat fabulous and creative projects. Thank you for the step by steps and the amazing inspiration x.
ReplyDeleteLove all the inspiration for these cute projects
ReplyDeleteLove all the ideas. Can’t wait to try them all out especially the monthly planner idea for my sister.
ReplyDeleteThese projects are so fab, love your clever use of the tag dies to create the camera. Thank you for sharing this lovely inspiration!
ReplyDeleteFabulous. Love the camera. Great way to stretch your dies. Hugz
ReplyDeleteGreat projects--thanks for this die segment on the blog...so inspiring. Stay well everyone.
ReplyDeleteGreat projects - with CUTPlorations - TFS
ReplyDeleteI love using dies!
ReplyDeleteYour projects are all so fun!
Thanks for the tips/ideas 😉
I ADORE these! WOW! That kite tag is awesome!
ReplyDeleteGreat idea shares. I like the kite and the tail = so fun! The idea for the journal months is very neat.
ReplyDeleteNice ideas I like the kite tag. But the camera is adorable, too.
ReplyDeleteReally creative ideas and love the nestled hearts and especially on the planner layout with the black plaid!
ReplyDeleteHow fun!
ReplyDeleteReally great use of dies! The kite tag is super cute.
ReplyDeleteWow, all of your projects are so creative and fun and pretty! Love the idea of the kite as well as the camera gift card holder. I don't do a planner or journal, but I still love this idea and will have to think of a reason to do those clips!
ReplyDeleteLove so much these cutie projects!!! Thanks for the inspiration!!!
ReplyDeleteSuch a fun post...wonderful projects.
ReplyDeleteCute and creative projects with these dies.
ReplyDeleteVery cute and
ReplyDeleteoh so fun! Love
the camera tag.
Carla from Utah
Such creative ideas. I love to get more use out of what I have and these projects are terrific!
ReplyDeleteThese are some really pretty project's and what a really clever idea using these dies
ReplyDeleteLove these projects!
ReplyDeleteVery clever!
ReplyDelete