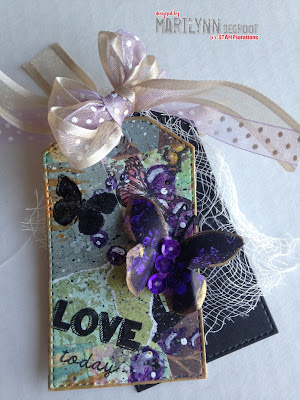
Hello, it is my turn to share with you a tutorial that will hopefully
instruct and inspire you to create.
I have a very limited crafting budget so I have a hard time
throwing even the smallest scraps away.
At least that is why I say I do it, if you ask my husband he
will say it I just because I am a hoarder.
Whatever the reason, I had some scraps on my
crafting table that I decided to use up.
Here is a photo of the pile I started with
I took the scraps and tore them smaller and glued them
randomly to a larger piece of cardstock.

I looked at the scraps and picked two acrylic paints that would
pick up colors from the base and tie the scraps together.
I choose gold and purple.
I put a small amount of each color of paint
into a plastic container.
I used ARTplorations Bubble Dance Stencil and
with a small paintbrush and the purple paint
I added purple bubbles randomly on the scrap base.
I also used ARTplorations Forest of Leaves stencil with the gold paint.
I also took some white paint and a bamboo
skewer to add some white highlights to the
bubbles.
I decided then to add black and white acrylic
paint dots to the bubbles.
Then with a toothbrush I splatter painted
with the white black and gold paint.
I then used CUTplorations Tag O'Coffee die cut to die cut 3 tags
I then used black stazon ink with the
STAMPlorations Sweet Spring Wishes stamp sets.
On a piece of white cardstock, stamped two butterflies from Trendy Butterflies
and three birds from the STAMPlorations Trendy Birds stamp set. I colored them using a purple marker.
I then fussy cut out two of the butterflies and one of the birds
I used Metallic Lustre to add gold to the body and edges of the butterflies
I used the gold on the bird's edges as well.
I also went around the edges of the tags with the gold.
I shape the butterflies to make them 3-d
I cut the wings apart half way down.
I cut only up to where the body is.
Then I shape the 4 parts over my fingers to give
them dimension.
When I fussy cut the butterflies out I cut
off the antennas. To make the antennas I cut
two very thin strips of black cardstock.
I fold the strips in half making a "V" shape.
and I glue them to the back of the butterflies.
I cut out a black tag using Tag O'Coffee die for
each tag. I also cut a piece of cheesecloth, and added ribbons
I layered the tags black cheesecloth then tag. I used the ribbons to hold
the layers together.
I know this was kind of a long post. Congratulations to you for making
it all they way through. I hope I inspired you in some way.
Go out and create art today.
ARTplorations/STAMPlorations/CUTplorations products used:


These are gorgeous et very creative tags !
ReplyDeletethose are so nice!
ReplyDeleteLoved how you started with the master-board and then how your project evolved into the fabulous tags. Thank you for the amazing inspiration and the step by step x
ReplyDeleteThese are so creative and so beautiful! I love how you created the background and will give this a try with some of my scraps, thank you! xxx
ReplyDelete