Hello everyone! Today I am here with my last tutorial post for the STAMPlorations mixed media design team this year. Before I get started I just want to say that it has been a wonderful two years working with these products and being supported by my warm and caring and very talented teammates. And, although I am leaving the design team to spend more time on my art career, I will continue to use my STAMPlorations products in new and creative ways which of course I will continue to share with all of you on my own blog.
So for this final tutorial post I am sharing how you can create fantastic backgrounds using ARTplorations Stencils, Ranger Distress Inks and Micro Glaze... three products that go together like peanut butter, honey and bananas. And as usual for me, this is going to be a very photo-heavy post, so get nice and comfy so you can enjoy the scroll through all my process photos... Smile.
To be able to really explore this technique I decided to use tags cut from 140lb watercolor paper using the largest die from the CUTplorations Manila Tag Nesting Dies set. I knew watercolor paper would stand up much better to the many times I would be using my heat gun in this process which only has three steps, but with all my inks and stencils... gave me almost unlimited possibilities! Here is my Process:
STEP 1: Apply Ink To The Tag Using A Blending Tool
This will be the main pattern in your background so choose stencil patterns and colors accordingly. I like using the blending tool because I get better ink coverage and a very clean pattern. I also use washi tape to hold the stencil in place so it doesn't move when I go in to layer on more colors of ink. Once you have finished adding the first layer of colors use the heat gun to make sure it is completely dry.
STEP 2: Apply Micro Glaze Through The Stencil Over Top Of The Inked Pattern
Remove and clean the ink off the stencil and then tape the clean stencil over top of the tag and using a new sponge on the blending tool, apply a layer of micro glaze. Micro Glaze is a water resistant sealer created especially for paper and dries with no residue, it just disappears like magic leaving only the colors behind. Because of this the color possibilities are endless, because you can protect each layer of color before adding the next one. The thicker the layer of Micro Glaze the better the barrier will be between each color of ink so don't be afraid to really layer it on, even letting the glaze create ridges along the edges of the stencil.
STEP 3: Add the Background Inks
Now for the fun part... on your craft mat create pools of ink by smooshing the ink pad onto the craft mat and spaying the smooshed ink with water until it puddles.
Dipping the tag into these puddles are how you add the background color. and the Micro Glaze creates a barrier between the different colors. Dip and re-dip into one or more colors until you have the coverage you want.
Use a heat gun to dry the tag. The heat also causes the glaze to melt into the paper and disappear, but if there is any left behind, just use a paper towel to burnish off the excess. Sometimes the second color of ink dries over top of the glaze but you can use a baby wipe to wipe off the last color without affecting the first color.
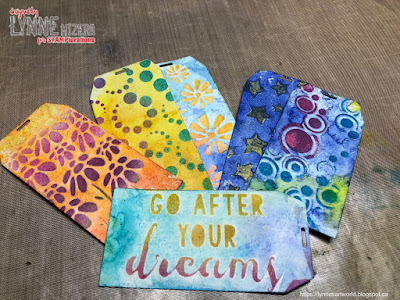
The more stencils and ink colors you have the more possibilities there are so don't limit yourself... just play and play! Here are just a few of the backgrounds I created.
And here are some of the finished tags...
It always amazes me how much YUMMIER everything is after adding a layer of Stickles and Liquid Glass!
Well that's it for this tutorial, I hope it inspires you to go play with your stencils and if you do, don't forget to link up to this month's Mixed Media challenge where it is always anything goes, except a card and you use a stencil, ANY stencil... the design team always chooses a winner and there are prizes!
And this month with the "Things With Wings" Challenge going on until the end of the month there are even MORE prizes for join in by sharing your mixed media project using at least one stencil and something with wings! (And of course the BIG SALE going on right now)


Love the layers of color.
ReplyDeleteWow! Amazingly colourful tags!
ReplyDeleteThank you Lynne for sharing all your gorgeous stenciled tags and photo steps. Good luck with your art venture. We will miss you, but look forward to your projects that you share on STAMPlorations. Hugs
ReplyDeleteso pretty tags.
ReplyDelete