
[Note: This month and next, we have several STAMPlorations girls guest designing and joining the regular Spotlight Project girls and sharing more awesome step-by-step projects that feature our 5x7 stamp club sets. We hope you get even more inspired!]

Hello STAMPlorations crafty friends... Helen is here as one of the Spotlight Project Guest Designers this month. I am so excited to have this opportunity to share with you a project showcasing STAMPlorations stamp club sets, CUTplorations dies, and ARTplorations stencils.

My card today has lots of layers and fussy cutting which a challenge for myself to work with them :) It is also a mixed media card.

I started with creating the flowers. First, I created the background using Distress Oxide Inks. I started with adding the lighter color, Fossilized Amber. I added the ink on the craft mat, sprayed the water, and dipped the watercolor paper. I repeated the same steps using the Peeled Paint ink. To create the layers of colors, I dried in between adding colors.
Once the watercolor paper was covered by the inks, I sprayed it with some water using Distress Sprayer Bottle, let it sit for couple of seconds, and dabbed it off with paper towel. This gives extra texture on the watercolor paper.

I dried it one more time with craft heater. Next step is stamping. I used Mini MISTI to stamp one of the flowers from Blossom Overture. I positioned the stamp on the paper on the area where I wanted it to be stamped, picked it up with the lid, and stamped it twice with Versafine Onyx Black Ink Pad. Stamping twice gives more solid and crisp image.
After all flowers have been stamped, I painted them with the Distress Oxide Inks. I simply added the ink on the craft mat and picked it up with the watercolor brush. I dried them with craft heater, and then I fussy cut them one by one with micro-tip scissors. After that, I used Micron Black Brush Pen to color the edges of the flowers.
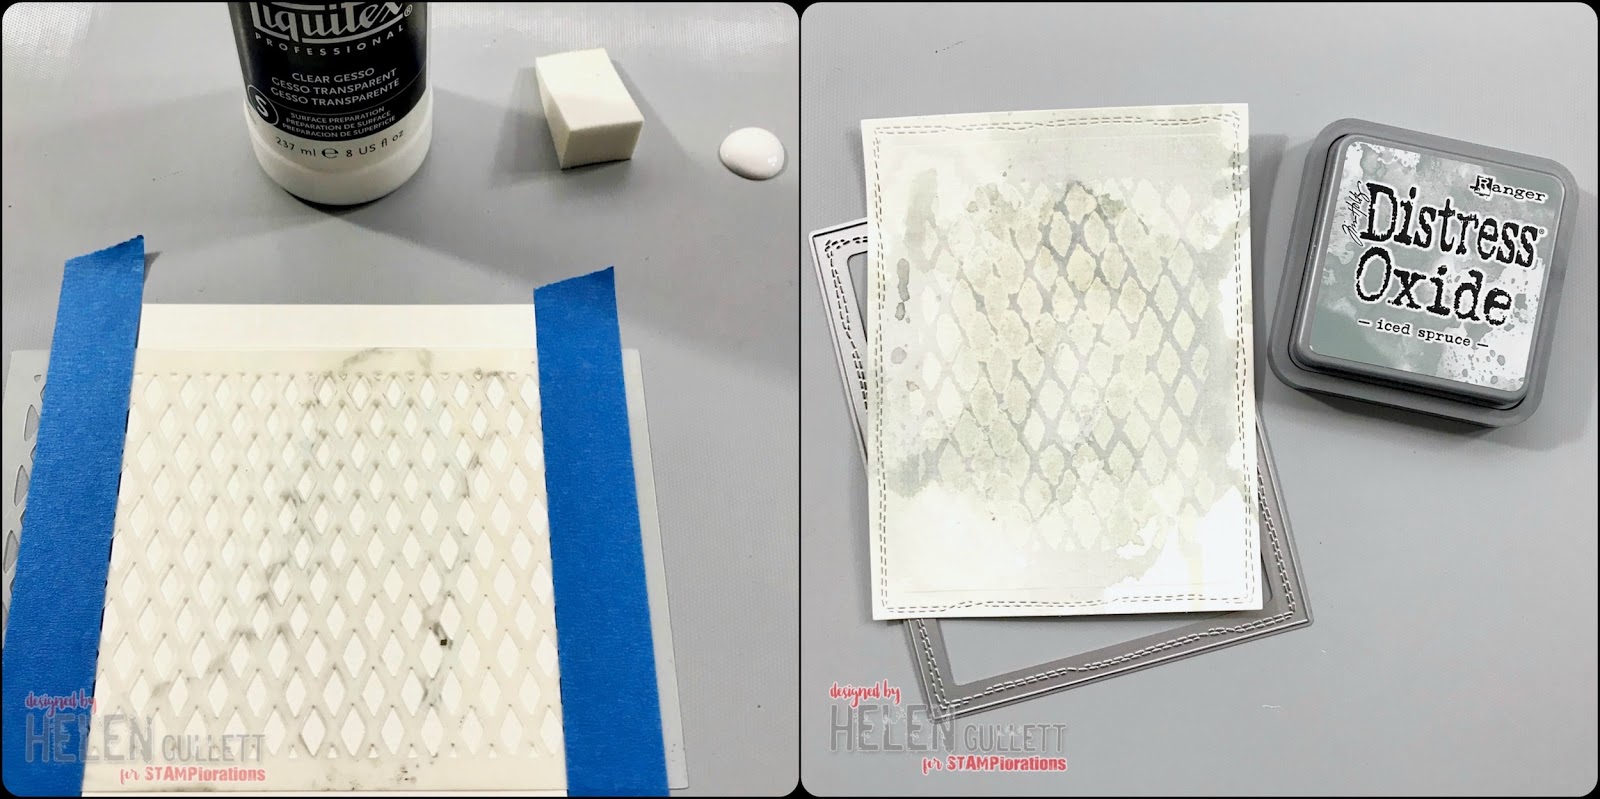
Next step is to create the card background. I added the Crisscrossed stencil on watercolor paper and secured it with painter tape. Using make sponge, I picked up the Clear Gesso and dabbed it on the stencil. I removed the stencil, and dried it with craft heater. You can let it dry on the side, but I have no patience to wait... LOL!
Then after the clear gesso dried, I added some of the Iced Spruced Distress Oxide Ink on the craft mat, sprayed with water, and dipped the paper. The clear gesso resisted the ink. I dried the panel once I liked the color on it.
I cut the panel with the largest size of the Crazy Double Running Stitch Rectangle Nesting Dies and I added it on the card base with dries-clear adhesive glue (or any favorite strong glue you have).

On a piece of white cardstock, I stamped the frames and sentiments from Blossom Overture with Mini MISTI and Versafine Onyx Black ink pad. After that, I fussy cut the frames and "lovely" word with micro-tip scissors, and then I cut each word into word strips with Fiskar Paper Cutter.

I added the frames on the card with dries-clear adhesive glue and 3D foam tape. For the roses, I added them on the frames using some adhesive glue and 3D foam tape for extra dimension on those roses. Next, I added the sentiments on the card with the same adhesive glue and 3D foam tape.

I thought this card need some extra sparkle... so I added some glitter on the roses using Spectrum Noir Sparkle Clear Glitter Brush Pen. Since it is a brush pen, it goes under the layers of roses well :)
I stamped the script stamp from Mixed Media Grunge on the card with Versafine Onyx Black Ink using clear stamping block. And... the card is done!
Before you go…get 20% off on all STAMPlorations regular and sale-priced stamps, stencils, and dies by using this code: STAMPGIRLHELEN when you check out (please copy and paste the code). Code can not be combined your code with any other discount codes. HAPPY SHOPPING!
I hope you enjoy this post today. Thank you so much for stopping by and have a wonderful day!
STAMPlorations products used:


Such beautiful work! Thanks so much for sharing!
ReplyDeleteits so very nice!
ReplyDeleteGorgeous, Helen!!!
ReplyDeleteBeautiful. Love the flowers!
ReplyDeleteHelen-- I always admire your work - thanks for showing us step by step how you created this lovely card - I love that amazing background and the fussy cut of the sentiment is way sooo cool - you did fabulous!
ReplyDeleteHelen, You're a genius at creating beautiful works of art! I love all the stamping layers and the fussy cuts - so beautiful!
ReplyDeleteWhat a stunning card - Love the dimension the die cuts under the rises give.
ReplyDeleteBlessings
Maxine
Oh, so pretty and I love the yellow and greys. Hugz
ReplyDelete