
[Note: This month and next, we have several STAMPlorations girls guest designing and joining the regular Spotlight Project girls and sharing more awesome step-by-step projects that feature our 5x7 stamp club sets. We hope you get even more inspired!]

Hello. My name is MariLynn and as guest designer today I am going to share a calorie free -easel card using designer paper, white cardstock, and the Sugar Rush set. Grab your spoon and lets dig in to this fun project.


I cut white cardstock into the following sizes.
5.5"x4.25"
2"x.75"
1.5"x.5"
2.5"x2.5"
and I used a circle punch to punch out .5" circles.

Out of a teal designer paper I cut out
5"x3.75"
2.75"x2.75"
5.5"x4.25"
2.25"x1"
1.75"x.75"
and I use a slightly bigger punch to get 5/8" circles

I cut two rectangles from complimentary designer papers.
4"x5.25
and 3.5"x4.75"

To decorate the inside of the card I cut
4.25"x2.75" of the blue
and 4"x2.5" of candy

I adhered the
4"x5.25" circle paper to the 5.5"x4.25" blue piece
and the
3.5"x4.75" candy paper to the 5"x3.75" blue piece

Using black StazOn ink I stamped the question mark image onto the white circles.

On the 2.5"x2.5"square of white, I stamped the ice cream image.

On the 1.5"x.5" rectangle, I stamped "WHAT'S THE".

On the 2'x.75" rectangle I stamped "SCOOP".

Next I colored the ice cream image. I used cheap coloring pencils to show you that you don't need to spend a lot of $ to get a great result. I picked 3 shades of brown, 1 pink, 1 peach and 2 shades of red.

I started with the darkest shade of brown and colored the edges of the ice cream cone/bowl.

Then I colored with the next darkest brown leaving a space in the middle.

Then I used the lightest brown to fill in the middle.

For the chocolate sauce, I used the darkest brown again. I only colored the left sides of the sauce image.

Then I used the middle shade of brown to finish coloring the sauce.

I colored some of the ice cream pink.

I colored the rest of the ice cream peach.

I used the darker red to color the right hand side and bottom of cherry.
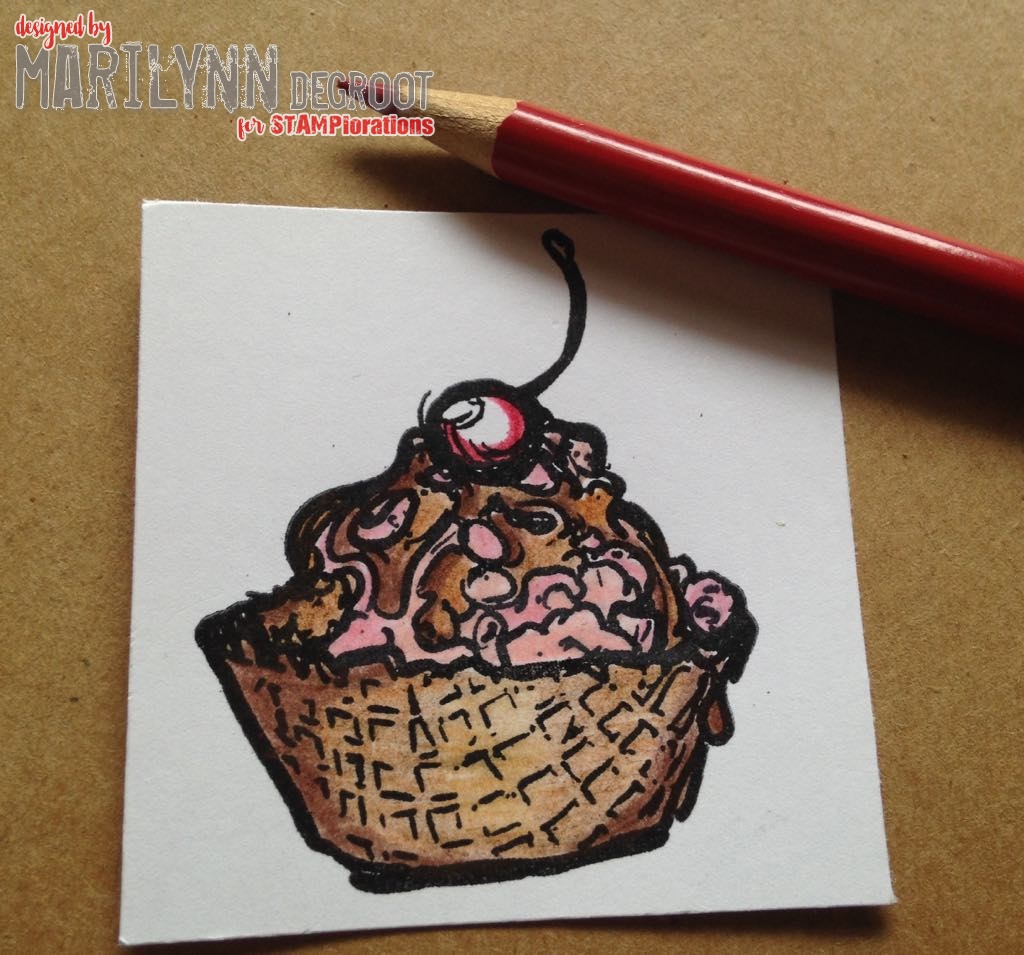
I used the lighter red to finish coloring the cherry. I made sure to not color the little highlight area. Leaving that white adds to the dimension of the coloring.

Finished off the coloring by using the darkest brown to color the stem of the cherry.

I adhered the .5" circles to the 5/8" circles.
The 1.5"x.5" white rectangle to the 1.75"x.75" blue rectangle.
The 2"x.75" white rectangle to the 2.25"x1" blue rectangle.
and the 2.5"x2.5" white square to the 2.75"x2.75"blue square..

I adhered the two layered dp rectangles on top of eachother with the smaller one centered.

I took a piece of ribbon that was 6.5" long. I wrapped it around the panels and taped it to the back.

I picked 4 gold brads.

I used the brads to adhere the ice cream panel to the card.

I adhered the "WHAT"S THE" panels in the left hand upper corner.

I adhered the "SCOOP" panels in the right hand lower corner.

Then I randomly adhered the "?" circles.

This is how the back side of my card looked. You can see the backs of the brads and where I taped the ribbon. It doesn't look very finished.

Since the back side shows on an easel card, I had to adheret the whole card onto a piece of white cardstock that was the same size. 4.25"x5.5" to give it an finished look.

The easel base is a piece of cardstock that measures 4.25"x 11"

Fold the easel base in half.

Take the top half of easel base and fold in half again.

The easel base kinda looks like a tent at this point.

Put glue only up to the first fold.

Match the bottom of the decorated card to the easel base.

For the inside of the easel I glued the
4.25"x2.75" of the blue
and 4"x2.5" of candy on top of the blue.

The final touch for this card was to add glitter to the ice cream.


It helped to tie into the glitter on the dp.

When shopping STAMPlorations at checkout if you you could use the discount code:
STAMPGIRLMARILYNN it will help both of us out. Thank you.
This is just amazing!! TFS!!
ReplyDeleteThank you Robyn for your sweet comment.
DeleteReally, really something. Awesome detail.....even my directionally challenged self can follow this!��
ReplyDeleteI love the cute image, lovely papers used too.
ReplyDeleteWhat a lovely cheerful card MariLynn, and thanks for the tutorial
ReplyDeleteBlessings
Maxine
its so wonderful card!
ReplyDeleteYou make me hungry with this project ,MariLynn!!! LOL!
ReplyDeleteYummy card and fab tutorial, thank you! xxx
ReplyDelete